Using firebase Database to create a chat application in Android(III)
What will I learn?
- Making user login system using firebase
- Making one time login
- Retrieving data from firebase database and displaying it in MainActivity
Requirement
- A PC/laptop with any Operating system such as Linux, Mac OSX, Windows OS
- Preinstalled Android Studio, Android SDK and JDK
Note: This tutorial is performed in Android Studio on the laptop with Windows 10 Home, 64 bit OS
Difficulty
Anybody with basic knowledge of Android can grasp the tutorial
Tutorial Content
In the previous tutorial we learned how to upload user profile picture in the firebase storage and save the link in the database so that we can use it further to display user’s information. In this tutorial we will be creating login activity to let user login and we will be making the UI look more attractive. We will also be creating one time login so that user does not have to login again and again. So let us begin.
Create a blank activity and name it LoginActivity

Open activity_login.xml and write the following code:
<?xml version="1.0" encoding="utf-8"?>
<LinearLayout xmlns:android="http://schemas.android.com/apk/res/android"
    xmlns:app="http://schemas.android.com/apk/res-auto"
    xmlns:tools="http://schemas.android.com/tools"
    android:layout_width="match_parent"
    android:layout_height="match_parent"
    android:orientation="vertical"
    tools:context="com.programminghub.simplechat.LoginActivity">

    <EditText
        android:id="@+id/email_et"
        android:layout_width="match_parent"
        android:layout_height="wrap_content" />
    <EditText
        android:id="@+id/password_et"
        android:layout_width="match_parent"
        android:layout_height="wrap_content" />

    <Button
        android:id="@+id/login_btn"
        android:layout_width="match_parent"
        android:layout_height="wrap_content" />
<Button
    android:id="@+id/signup_btn"
    android:text="SignUp"
    android:layout_width="wrap_content"
    android:layout_height="wrap_content" />

</LinearLayout>
We will be adding two EditText in order to get email and password of user and we will also be adding two Buttons. Login button will allow user to login and signup button will be opening SignUpActivity so that the user can sign up in our application.
Now open LoginActivity.java. In order to make our user login to the application we should use FirebaseAuth instance.
loginAuth.signInWithEmailAndPassword(email,password).addOnCompleteListener(this, new OnCompleteListener<AuthResult>() {
    @Override
    public void onComplete(@NonNull Task<AuthResult> task) {
        if(task.isSuccessful()){
            Intent mainIntent=new Intent(LoginActivity.this,MainActivity.class);
            startActivity(mainIntent);
        }else{
            Toast.makeText(LoginActivity.this, "error:"+task.getException().getMessage(), Toast.LENGTH_SHORT).show();
        }
    }


});
Here signInWithEmailAndPassword method is called to check whether the user having particular email exists or not. If the result is successful then we the user have successfully logged in and the user will be redirected to our MainActivity but if the login is not successful we will be showing a Toast message which will display the error message.
Now let us open our AndroidManifest and make our LoginActivity the default launcher activity.
<activity android:name=".LoginActivity">
    <intent-filter>
        <action android:name="android.intent.action.MAIN" />

        <category android:name="android.intent.category.LAUNCHER" />
    </intent-filter>
</activity>
Now let us run the application. As we have made our default launcher LoginActivity so LoginActivity loads at first
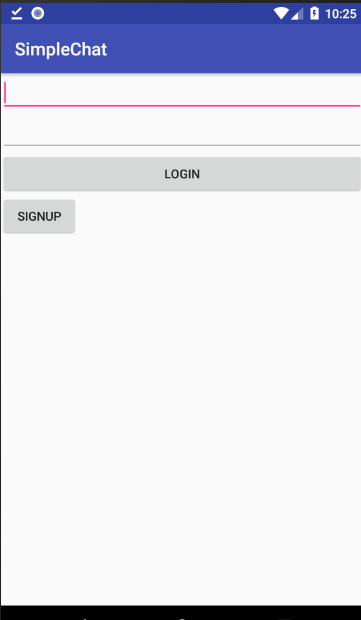
Here if we pressed signup button then SignUpActivity will be displayed as we have passed intent to SignUpActivity and now let us click on login button. As we already performed validation we can leave the email and password field empty.
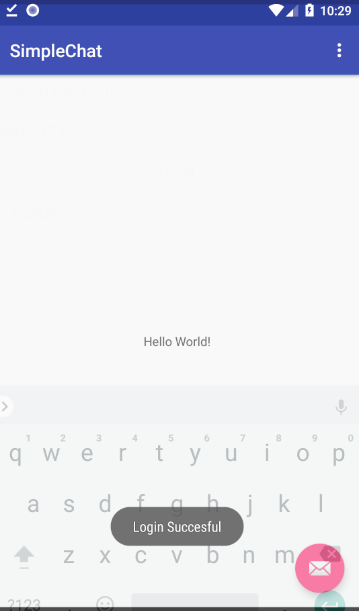
Here we can see that we successfully logged in and we successfully displayed the Toast message too. Now if we add wrong information then it too shows the error message like this:
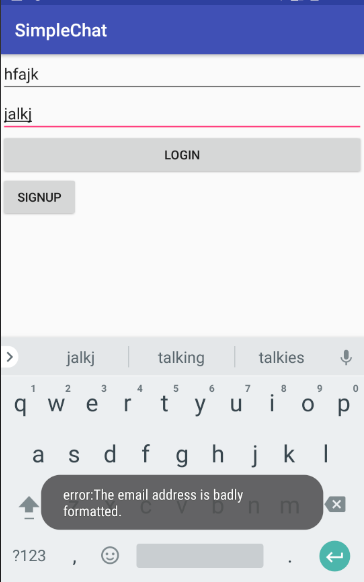
Now we successfully created login but the user has to login again and again if they open the app. So now we will be using getting value of userId each time we open the login activity. If the value of userId is empty then we will let the user login and display our LoginActivity but if the userId is not empty then we will directly open our MainActivity so that user doesnot have to login again and again. This can be achieved simply by:
if(TextUtils.isEmpty(loginAuth.getCurrentUser().getUid())) {
    setContentView(R.layout.activity_login);
    defineView();
    addClickListener();
}else{
    Intent mainIntent=new Intent(this,MainActivity.class);
    startActivity(mainIntent);
    finish();
}
Firebase keeps the cache of current users as soon as the user logins or signup so we shouldn’t cache user’s id manually using Shared Preferences. Now as we run our application we can see that it directly opens up MainActivity without opening LoginActivity. Here we have added finish() right after startActivity() so that we can finish this activity. Now the app will be directly exited if the user presses the back button after he/she logs in.
The final code of LoginActivity looks like this:
public class LoginActivity extends AppCompatActivity {

    EditText emailEt,passwordEt;
    Button loginBtn,signUpBtn;
    String email,password;
    FirebaseAuth loginAuth;
    @Override
    protected void onCreate(Bundle savedInstanceState) {
        super.onCreate(savedInstanceState);
        initView();
        if(TextUtils.isEmpty(loginAuth.getCurrentUser().getUid())) {
            setContentView(R.layout.activity_login);
            defineView();
            addClickListener();
        }else{
            Intent mainIntent=new Intent(this,MainActivity.class);
            startActivity(mainIntent);
            finish();
        }
    }
    private void initView(){
        loginAuth=FirebaseAuth.getInstance();

    }
    private void defineView(){
        emailEt=findViewById(R.id.email_et);
        passwordEt=findViewById(R.id.password_et);
        loginBtn=findViewById(R.id.login_btn);
        signUpBtn=findViewById(R.id.signup_btn);
    }
    private void addClickListener(){
        loginBtn.setOnClickListener(new View.OnClickListener() {
            @Override
            public void onClick(View view) {
                if (isValid())
                    login();
            }
        });

        signUpBtn.setOnClickListener(new View.OnClickListener() {
            @Override
            public void onClick(View view) {
                Intent signupIntent=new Intent(LoginActivity.this,SignupActivity.class);
                startActivity(signupIntent);
            }
        });
    }
    private boolean isValid(){
        boolean isValid=false;
        email=emailEt.getText().toString();
        password=passwordEt.getText().toString();
        if(TextUtils.isEmpty(email))
            emailEt.setError("Required");
        else if (TextUtils.isEmpty(password))
            passwordEt.setError("Required");
        else
            isValid=true;
        return isValid;
    }

    private void login(){
        loginAuth.signInWithEmailAndPassword(email,password).addOnCompleteListener(this, new OnCompleteListener<AuthResult>() {
            @Override
            public void onComplete(@NonNull Task<AuthResult> task) {
                if(task.isSuccessful()){
                    Toast.makeText(LoginActivity.this, "Login Succesful", Toast.LENGTH_SHORT).show();
                    Intent mainIntent=new Intent(LoginActivity.this,MainActivity.class);
                    startActivity(mainIntent);
                }else{
                    Toast.makeText(LoginActivity.this, "error:"+task.getException().getMessage(), Toast.LENGTH_SHORT).show();
                }
            }


        });
    }
Now, let us display our user information stored in firebase database in our MainActivity.
So let us open content_main.xml
<?xml version="1.0" encoding="utf-8"?>
<LinearLayout xmlns:android="http://schemas.android.com/apk/res/android"
    xmlns:app="http://schemas.android.com/apk/res-auto"
    xmlns:tools="http://schemas.android.com/tools"
    android:layout_width="match_parent"
    android:orientation="vertical"
    android:layout_height="match_parent"
    app:layout_behavior="@string/appbar_scrolling_view_behavior"
    tools:context="com.programminghub.simplechat.MainActivity"
    tools:showIn="@layout/activity_main">
    <ImageView
        android:id="@+id/show_user_profile"
        android:layout_width="match_parent"
        android:layout_height="wrap_content" />
    <TextView
        android:id="@+id/show_user_email"
        android:layout_width="wrap_content"
        android:layout_height="wrap_content"
        />

</LinearLayout>
Here we have one ImageView to display user’s Image and we have a TextView to display user’s email.
Now as we are going to load our use’s image by using image url we will be using Gide library to load image as it is very simple, faster and easy to use.
So open your gradle and add the dependency of glide. Also add the dependency for cardview which we will be using later to make our UI more attractive.
compile 'com.github.bumptech.glide:glide:3.8.0'
compile 'com.android.support:cardview-v7:26.1.0'
Now let us open MainActivity.java
In order to get the user information we should fetch the user’s data from firebase database. We can simply do it by
FirebaseDatabase.getInstance().getReference().child("simpleChat").child("users")
        .child(FirebaseAuth.getInstance().getCurrentUser().getUid())
        .addListenerForSingleValueEvent(new ValueEventListener() {
            @Override
            public void onDataChange(DataSnapshot dataSnapshot) {
                User user= dataSnapshot.getValue(User.class);
                if(user!=null){
                    Glide.with(MainActivity.this).load(user.getProfilePic()).into(showUserProfile);
                    showUserEmail.setText(user.getEmailAddress());
                }

            }

            @Override
            public void onCancelled(DatabaseError databaseError) {

            }
        });
Here as we know that we pushed our user object inside simpleChat->users and finally inside userId so we should first get the reference upto userId and then we will be adding ListenerForSingleValueEvent. Here we can attach different type of value listener depending on our application. Here we are using LinstenerForSingleValueEvent because we only want to get the information of single user. If we want to fetch the information of all users then we can use ListenerForValueEvent.
We can then get user information by getting the value of datasnapshot.
Here, the User class should contain an empty constructor compulsorily otherwise it will throw an run time error.
Now let us run the application
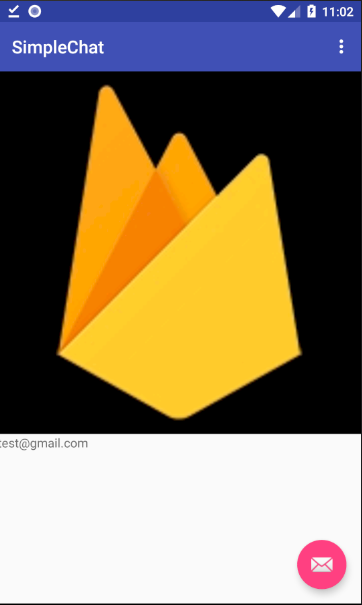
We successfully displayed the user’s photo and email address by getting the information of user from firebase database. Now let us refine our Login and Signup Activity
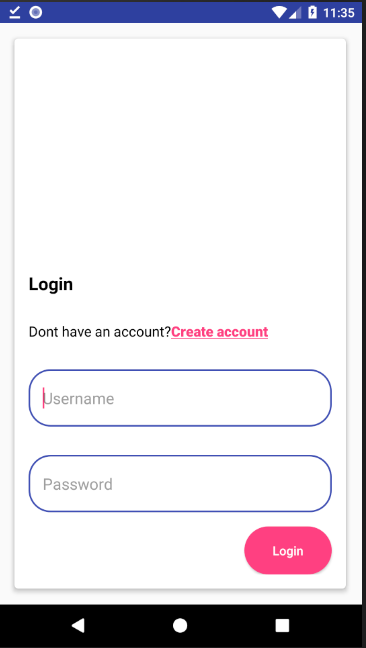
I have made LoginActivity look like this using some cardview. This is the code for content_login.
<?xml version="1.0" encoding="utf-8"?>
<android.support.v7.widget.CardView xmlns:android="http://schemas.android.com/apk/res/android"
    xmlns:app="http://schemas.android.com/apk/res-auto"
    xmlns:tools="http://schemas.android.com/tools"
    android:layout_width="match_parent"
    android:layout_height="match_parent"
    android:layout_margin="18dp"
    android:orientation="vertical"
    app:cardCornerRadius="4dp"
    app:cardElevation="4dp"
    app:layout_behavior="@string/appbar_scrolling_view_behavior"
    tools:context="com.programminghub.simplechat.LoginActivity">

    <LinearLayout

        android:layout_width="match_parent"
        android:layout_height="match_parent"
        android:layout_marginBottom="@dimen/margin_avg"
        android:gravity="bottom"
        android:orientation="vertical"
        android:weightSum="1">


        <TextView
            android:layout_width="wrap_content"
            android:layout_height="0dp"
            android:layout_marginLeft="@dimen/margin_avg"
            android:layout_weight="0.1"
            android:gravity="center"
            android:text="Login"
            android:textColor="@color/black"
            android:textSize="@dimen/text_size_extra_large"
            android:textStyle="bold" />

        <LinearLayout
            android:layout_width="wrap_content"
            android:layout_height="0dp"
            android:layout_gravity="left"
            android:layout_marginLeft="@dimen/margin_avg"
            android:layout_weight="0.1"
            android:orientation="horizontal">

            <TextView

                android:layout_width="wrap_content"
                android:layout_height="wrap_content"
                android:layout_gravity="center"
                android:gravity="center"
                android:text="@string/dont_have"
                android:textColor="@color/black"
                android:textSize="@dimen/text_size_large" />

            <Button
                android:id="@+id/signup_btn"
                android:layout_width="wrap_content"
                android:layout_height="wrap_content"
                android:layout_gravity="center"
                android:background="@android:color/transparent"
                android:gravity="center"
                android:text="@string/create_account"
                android:textAllCaps="false"
                android:textColor="@color/colorAccent"
                android:textSize="@dimen/text_size_large"
                android:textStyle="bold" />
        </LinearLayout>

        <EditText
            android:id="@+id/email_et"
            android:layout_width="match_parent"
            android:layout_height="0dp"
            android:layout_margin="@dimen/margin_avg"
            android:layout_weight="0.12"
            android:background="@drawable/rectangle_backgroung_edittext"
            android:hint="Username"
            android:padding="@dimen/padding_avg" />

        <EditText
            android:id="@+id/password_et"
            android:layout_width="match_parent"
            android:layout_height="0dp"
            android:layout_margin="@dimen/margin_avg"
            android:layout_weight="0.12"
            android:background="@drawable/rectangle_backgroung_edittext"
            android:hint="Password"
            android:inputType="textPassword"
            android:padding="@dimen/padding_avg" />

        <Button
            android:id="@+id/login_btn"
            android:layout_width="wrap_content"
            android:layout_height="0dp"
            android:layout_gravity="right"
            android:layout_marginRight="@dimen/margin_avg"
            android:layout_weight="0.1"
            android:background="@drawable/curved_button"
            android:paddingLeft="@dimen/padding_big"
            android:paddingRight="@dimen/padding_big"
            android:text="Login"
            android:textAllCaps="false"
            android:textColor="@color/white"

            />


    </LinearLayout>
</android.support.v7.widget.CardView>
I have make SignupActivity look like this:
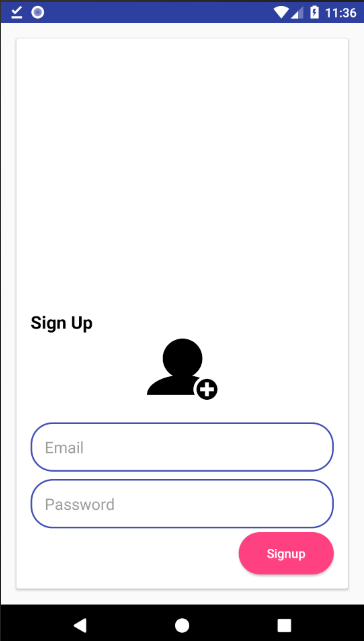
The code for signup_activity is:
<?xml version="1.0" encoding="utf-8"?>
<android.support.v7.widget.CardView xmlns:android="http://schemas.android.com/apk/res/android"
    xmlns:app="http://schemas.android.com/apk/res-auto"
    xmlns:tools="http://schemas.android.com/tools"
    android:layout_width="match_parent"
    android:layout_height="match_parent"
    android:layout_margin="18dp"
    android:orientation="vertical"
    tools:context="com.programminghub.simplechat.SignupActivity">

    <ScrollView
        android:layout_width="match_parent"
        android:layout_height="match_parent"
        android:scrollbarThumbVertical="@android:color/transparent">


        <LinearLayout
            android:layout_width="match_parent"
            android:layout_height="match_parent"
            android:layout_gravity="bottom"
            android:orientation="vertical">


            <TextView
                android:layout_width="wrap_content"
                android:layout_height="0dp"
                android:layout_marginLeft="@dimen/margin_avg"
                android:layout_weight="0.1"
                android:gravity="center"
                android:text="Sign Up"
                android:textColor="@color/black"
                android:textSize="@dimen/text_size_extra_large"
                android:textStyle="bold" />


            <ImageView
                android:id="@+id/show_user_profile"
                android:layout_width="80dp"
                android:layout_height="80dp"
                android:layout_gravity="center"
                android:layout_marginBottom="@dimen/margin_avg"
                android:src="@drawable/ic_add_profile"

                />

            <EditText
                android:id="@+id/email_et"
                android:layout_width="match_parent"
                android:layout_height="wrap_content"
                android:layout_marginBottom="@dimen/margin_min"
                android:layout_marginLeft="@dimen/margin_avg"
                android:layout_marginRight="@dimen/margin_avg"
                android:layout_marginTop="@dimen/margin_min"
                android:background="@drawable/rectangle_backgroung_edittext"
                android:hint="Email"
                android:padding="@dimen/padding_avg" />

            <EditText
                android:id="@+id/password_et"
                android:layout_width="match_parent"
                android:layout_height="wrap_content"
                android:layout_marginBottom="@dimen/margin_min"
                android:layout_marginLeft="@dimen/margin_avg"
                android:layout_marginRight="@dimen/margin_avg"
                android:layout_marginTop="@dimen/margin_min"
                android:background="@drawable/rectangle_backgroung_edittext"
                android:hint="Password"
                android:padding="@dimen/padding_avg" />


            <Button
                android:id="@+id/signup_btn"
                android:layout_width="wrap_content"
                android:layout_height="wrap_content"
                android:layout_gravity="right"
                android:layout_marginBottom="@dimen/margin_avg"
                android:layout_marginRight="@dimen/margin_avg"
                android:background="@drawable/curved_button"
                android:paddingLeft="@dimen/padding_big"
                android:paddingRight="@dimen/padding_big"
                android:text="Signup"
                android:textAllCaps="false"
                android:textColor="@color/white" />

        </LinearLayout>

    </ScrollView>

</android.support.v7.widget.CardView>
In this layouts I have defined some string, color, dimen inside the file of values folder and accessed them.
You can change your view as per your requirement.
In this tutorial we made a login screen, made one time login did some changes in UI and we also learnt to retrieve data from firebase database and display it in our view. Now in our next tutorial we will be making the layout for our MainActivity by using tab layouts and we will learn many more.
All above codes are available in my Github. Click here to download.
Curriculam
Using firebase Database to create a chat application in Android : Part I
Using Firebase Database to create a chat application in Android : Part II
Posted on Utopian.io - Rewarding Open Source Contributors
Thank you for the contribution. It has been approved.
You can contact us on Discord.
[utopian-moderator]
Downvoting a post can decrease pending rewards and make it less visible. Common reasons:
Submit
Hey @programminghub I am @utopian-io. I have just upvoted you!
Achievements
Community-Driven Witness!
I am the first and only Steem Community-Driven Witness. Participate on Discord. Lets GROW TOGETHER!
Up-vote this comment to grow my power and help Open Source contributions like this one. Want to chat? Join me on Discord https://discord.gg/Pc8HG9x
Downvoting a post can decrease pending rewards and make it less visible. Common reasons:
Submit