What will I learn?
- Sending list of users to fragment
- Using one fragment to display multiple type of user list instead of making different fragment
- Displaying list of total users registered in our database in our “Users” tab fragment
Requirement
- A PC/laptop with any Operating system such as Linux, Mac OSX, Windows OS
- Preinstalled Android Studio, Android SDK and JDK
Note: This tutorial is performed in Android Studio on the laptop with Windows 10 Home, 64 bit OS
Difficulty
Anybody with basic knowledge of Android can grasp the tutorial
Tutorial Content
In the previous tutorial we successfully implemented tablayout and viewpager in our home page and we also showed the static list of users in recycler view. In this session we are going to display all the list of users from firebase database in out users tab. In our previous sections we displayed our user’s list in ShowUserListFragment but in this session we will learn to pass list of users in ShowUserListFragment and we will be displaying user accordingly.
First of all open MainActivity.java
Set up static lists for all the tab fragment
private List<User> setUpUserList(){
    List<User> userList=new ArrayList<>();
    userList.add(new User("[email protected]","1",""));
    userList.add(new User("[email protected]","2",""));
    userList.add(new User("[email protected]","3",""));
    return userList;
}
private List<User> setUpChatListUsers(){
    List<User> userList=new ArrayList<>();
    userList.add(new User("[email protected]","1",""));
    return userList;
}
private List<User> setUpOnlineUsers(){
    List<User> userList=new ArrayList<>();
    userList.add(new User("[email protected]","1",""));
    userList.add(new User("[email protected]","3",""));
    return userList;
}
Here we are returning user list as per the requirement. In setUpUserList() we are returning all the users in setUpChatListUsers() we are returning the list of users we have chatted with and in setUpOnlineUsers we have returned list of users who are online. Here we are calling three different functions so that we can reuse one fragment again and again instead of using three different fragment. Now we have to pass this user list to ShowUserListFragment so that it will display the users. Here ShowUserListFragment is unware of the different types of users list it is displaying. Its work is simply getting the list and displaying it. In order to get the list of user we will be using newInstance() method.
private static final String ARG_PARAM_USER_LIST = "userList";
private List<User> userList;
public ShowUserListFragment() {
    // Required empty public constructor
}


public static ShowUserListFragment newInstance(List<User> userList) {
    ShowUserListFragment fragment = new ShowUserListFragment();
    Bundle args = new Bundle();
    args.putSerializable(ARG_PARAM_USER_LIST, (Serializable) userList);
    fragment.setArguments(args);
    return fragment;
}
It will look something like this. Initially we used our default constructor ShowUserListFragment() to display our fragment but now we will be using newInstance() method to call our ShowUserListFragment to receive the list of users. Here we have used args.putSerializable() to put the list of users of we should implement Serializable in our User.java class like this:
public class User implements Serializable {

    private String emailAddress;
    private String userId;
    private String profilePic;

    public User() {
    }

    public User(String emailAddress, String userId, String profilePic) {
        this.emailAddress = emailAddress;
        this.userId = userId;
        this.profilePic = profilePic;
    }

    public String getEmailAddress() {
        return emailAddress;
    }

    public void setEmailAddress(String emailAddress) {
        this.emailAddress = emailAddress;
    }

    public String getUserId() {
        return userId;
    }

    public void setUserId(String userId) {
        this.userId = userId;
    }

    public String getProfilePic() {
        return profilePic;
    }

    public void setProfilePic(String profilePic) {
        this.profilePic = profilePic;
    }
}
We will be saving the list of users in bundle and we will be setting the argument of fragment so that we can access the list of users once the fragment is created
@Override
public void onCreate(Bundle savedInstanceState) {
    super.onCreate(savedInstanceState);
    if (getArguments() != null) {
        userList = (List<User>) getArguments().getSerializable(ARG_PARAM_USER_LIST);

    }
}
Here we get the userList by getting the argument of fragment we had saved while calling newInstance method.The code of SetUpUserListFragment looks like this:
public class ShowUserListFragment extends Fragment {
    // TODO: Rename parameter arguments, choose names that match
    // the fragment initialization parameters, e.g. ARG_ITEM_NUMBER
    RecyclerView showUserList;

  //  private OnFragmentInteractionListener mListener;

    private static final String ARG_PARAM_USER_LIST = "userList";
    private List<User> userList;
    public ShowUserListFragment() {
        // Required empty public constructor
    }


    public static ShowUserListFragment newInstance(List<User> userList) {
        ShowUserListFragment fragment = new ShowUserListFragment();
        Bundle args = new Bundle();
        args.putSerializable(ARG_PARAM_USER_LIST, (Serializable) userList);
        fragment.setArguments(args);
        return fragment;
    }

    @Override
    public void onCreate(Bundle savedInstanceState) {
        super.onCreate(savedInstanceState);
        if (getArguments() != null) {
            userList = (List<User>) getArguments().getSerializable(ARG_PARAM_USER_LIST);

        }
    }

    @Override
    public View onCreateView(LayoutInflater inflater, ViewGroup container,
                             Bundle savedInstanceState) {
        // Inflate the layout for this fragment
        View view= inflater.inflate(R.layout.fragment_show_user_list, container, false);
        defineView(view);
        return view;
    }

    private void defineView(View view){
        showUserList=view.findViewById(R.id.show_user_list);
        LinearLayoutManager layoutManager=new LinearLayoutManager(getContext());
        layoutManager.setOrientation(LinearLayoutManager.VERTICAL);
        showUserList.setLayoutManager(layoutManager);

        UserListAdapter listAdapter=new UserListAdapter(userList);
        showUserList.setAdapter(listAdapter);
    }


    // TODO: Rename method, update argument and hook method into UI event
   /* public void onButtonPressed(Uri uri) {
        if (mListener != null) {
            mListener.onFragmentInteraction(uri);
        }
    }*/

    @Override
    public void onAttach(Context context) {
       super.onAttach(context);
       /* if (context instanceof OnFragmentInteractionListener) {
            mListener = (OnFragmentInteractionListener) context;
        } else {
            throw new RuntimeException(context.toString()
                    + " must implement OnFragmentInteractionListener");
        }*/
    }

    @Override
    public void onDetach() {
        super.onDetach();
      //  mListener = null;
    }

    /**
     * This interface must be implemented by activities that contain this
     * fragment to allow an interaction in this fragment to be communicated
     * to the activity and potentially other fragments contained in that
     * activity.
     * <p>
     * See the Android Training lesson <a href=
     * "http://developer.android.com/training/basics/fragments/communicating.html"
     * >Communicating with Other Fragments</a> for more information.
     */
   /* public interface OnFragmentInteractionListener {
        // TODO: Update argument type and name
        void onFragmentInteraction(Uri uri);
    }*/
}
Now finally open MainActivity.java in in our setUpViewPager() method
private void setupViewPager(ViewPager viewPager) {

    ViewPagerAdapter adapter = new ViewPagerAdapter(getSupportFragmentManager());
    //  adapter.addFragment(new CuriosityModeFeatured(),"Featured");
    adapter.addFragment(new ShowUserListFragment().newInstance(setUpUserList()), "Users");
    adapter.addFragment(new ShowUserListFragment().newInstance(setUpChatListUsers()),"Chats");
    adapter.addFragment(new ShowUserListFragment().newInstance(setUpOnlineUsers()),"Online");

    viewPager.setAdapter(adapter);
    tabLayout.setupWithViewPager(viewPager);

}
We will be changing as above. Here we have called passed different list of users . In our previous tutorial we had displayed same list of users in the fragment but here we can see that we can set userList according to our requirement and we don’t even have to make multiple fragment. Now let us run our application:
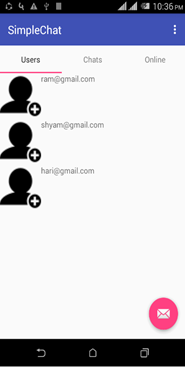
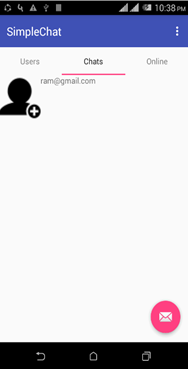
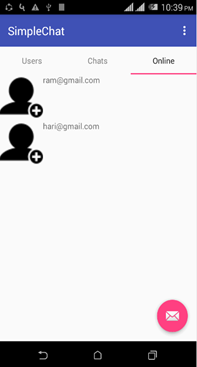
Here we can see that we have displayed different user list according to the tabs . Users tabs is displaying all the user list. Chats tab is displaying the user that we have chatted with and online tab is showing the list of user who are online. Now we will be displaying the list of all users available from the firebase database. Show let us open setUpUserList() method of MainActivity.
private List<User> setUpUserList(){
    final List<User> userList=new ArrayList<>();
    FirebaseDatabase.getInstance().getReference().child("simpleChat").child("users").addValueEventListener(new ValueEventListener() {
        @Override
        public void onDataChange(DataSnapshot dataSnapshot) {
           Iterator<DataSnapshot> iterator=  dataSnapshot.getChildren().iterator();
           while (iterator.hasNext()){
               DataSnapshot snapshot=iterator.next();
               userList.add(snapshot.getValue(User.class));
           }

        }

        @Override
        public void onCancelled(DatabaseError databaseError) {

        }
    });
    return userList;
}
Here addValueEventListener is used to get the list of items from the database. We convert the dataSnapshot provided by onDataChange() method to iterator of datasnapshot and we the use while loop to add all the uses in our in userList and we finally return the userList to the setUpUserList() method
We get the output like this:
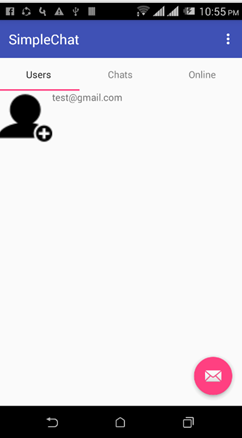
We only have one user in our database, so it is only displaying one user. Let us try adding other user and see what happen.
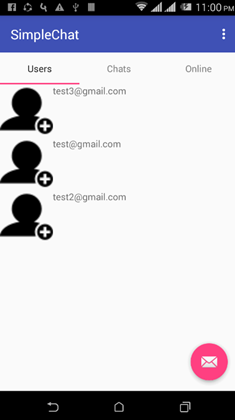
It successfully displayed all the users of our database. Open firebase database to recheck the list of users the application is displaying.
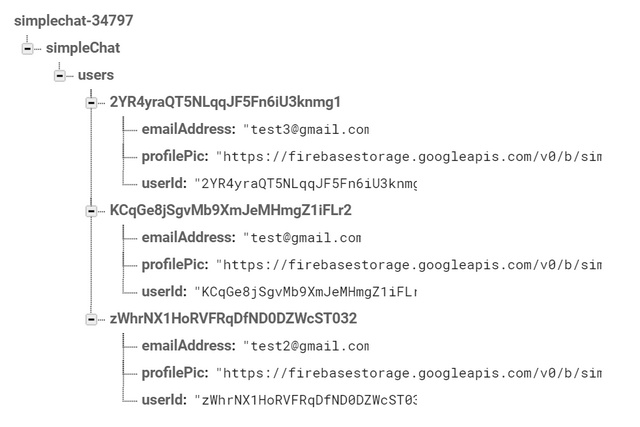
Here inside the “users” node all the users are registered users and our application should show all these users. Now in order to display user’s profile we will be using Glide library which I have already taught in my previous tutorials.
Add the dependency in gradle and open UserListAdapter.java and all following code in ViewHolder class
class ViewHolder extends RecyclerView.ViewHolder{

    TextView email;
    ImageView showUserProfile;
    public ViewHolder(View itemView) {
        super(itemView);
        email=itemView.findViewById(R.id.show_user_email);
        showUserProfile=itemView.findViewById(R.id.show_user_profile);
    }
    public void bindView(User user){
        email.setText(user.getEmailAddress());
        Glide.with(showUserProfile.getContext()).load(user.getProfilePic()).into(showUserProfile);

    }
}
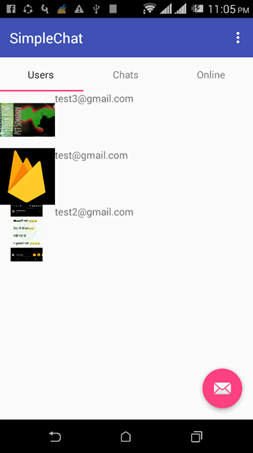
We successfully displayed list of user according to their profile picture.
Here in this tutorial we learnt to send the user list to our fragment from our MainActivity , we learnt to reuse same fragment and we displayed the list of total user from our firebase database n our “Users” tab fragment.
In our next series we will be learning to create ChatActivity and Chat viewholder to let our users give chat interface.
All above codes are available in my Github. Click here to download.
Curriculam
Using firebase Database to create a chat application in Android : Part I
Using Firebase Database to create a chat application in Android : Part II
Using Firebase Database to create a chat application in Android : Part III
Using Firebase Database to create a chat application in Android : Part IV
Posted on Utopian.io - Rewarding Open Source Contributors
Thank you for the contribution. It has been approved.
You can contact us on Discord.
[utopian-moderator]
Downvoting a post can decrease pending rewards and make it less visible. Common reasons:
Submit
Hey @yandot, I just gave you a tip for your hard work on moderation. Upvote this comment to support the utopian moderators and increase your future rewards!
Downvoting a post can decrease pending rewards and make it less visible. Common reasons:
Submit
Hey @programminghub I am @utopian-io. I have just upvoted you!
Achievements
Community-Driven Witness!
I am the first and only Steem Community-Driven Witness. Participate on Discord. Lets GROW TOGETHER!
Up-vote this comment to grow my power and help Open Source contributions like this one. Want to chat? Join me on Discord https://discord.gg/Pc8HG9x
Downvoting a post can decrease pending rewards and make it less visible. Common reasons:
Submit