Welcome to the seventh Video Tutorial of the Materialize CSS! Also this video tutorial is the first episode of the "Creating Login Form. This tutorial video about "Creating Professional Pop-Up Login Form with using Modal Concepts and XAMPP Localhost Server From Scratch. In this tutorial video we used Materialize CSS Library and jQuery JavaScript Library. I hope you enjoy this tutorial video!

What Will I Learn?
- You will learn how to create Modal Log In Form with Pop-Up effect.
- You will learn what is modal methods and you will learn how to use modal methods.
- You will learn how to use input placeholder for creating Log In form.
- You will learn how to create a button that changes color when clicked.
- You will learn what is the modal-footer and what is it effect.
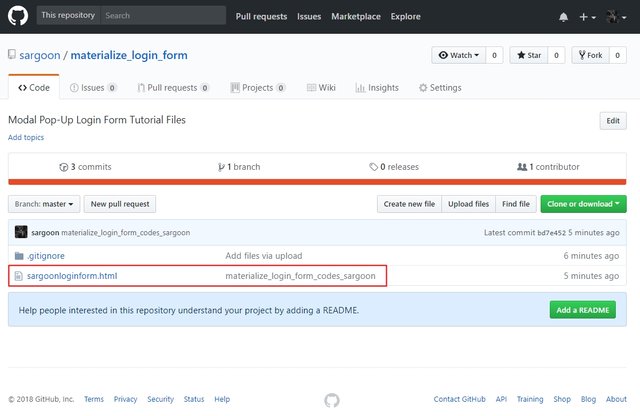
Files and Codes GitHub Repository

You can access the project codes and Log In form file here.
Requirements
- Materialize Full Package 1.0.0-beta version (CSS and JS [minified and unminified]).
- Materialize JavaScript Ajax Library (1.0.0-beta version).
- Microsoft Visual Studio Code. (or another text editor).
- jQuery 3.3.1 Compressed (minified version).
- jQuery Ajax Library (with CDNjs).
- A Standard Computer.
- A Standard Browser.
- XAMPP Control Panel Server.
- No special operating system required, Materialize works on all operating systems.
Difficulty
- The difficulty is intermediate.
Description
Hello dear learners, welcome to the seventh episode of the Materialize CSS Education Series. Also this video is the first episode of the creating login form.
In this tutorial video, we created a professional Log In form with using modal concepts from scratch. For this tutorial, we used Materialize CSS Full Package , Materialize Minified CSS Library, Materialize Minified JavaScript Library, jQuery JavaScript 3.3.1 Ajax Library. Also we used XAMPP Control Panel Server for localhost server connection. I explained in detail all the commands used when creating Pop-Up Login Form. In this tutorial video, we used Materialize package instead of CDN Bootstrap.
Also I gave technical information about creating Log In form classes, script, modal concepts and other commands. Our Materialize education series will progress from basic - intermediate to advanced. All the programs described in the video Materialize Full CSS Package (1.0.0-beta version), Visual Studio Code, Materialize Minified JavaScript Library, jQuery 3.3.1 Minified Library, XAMPP Control Panel Server , jQuery Ajax JS Minified Library) are open source and are all included in the links section of the GitHub repositories (Except XAMPP Control Panel Server). If you wish, you can access the web pages of these programs and download links for Windows from the links section. And also you can access the project codes and Log In form files in Files and Codes section.
In the second episode, I will teach you how to connect this Log In form with authentication to the MySQL phpMyAdmin database.
My Operating System
Let's Take a Look Some Additional Steps About Pop-Up Login Form Tutorial
First Step:

First of all, we used the addresses of the libraries we need between the head commands. Materialize CSS (1.0.0-beta version, full package), Materialize Minified CSS Library, jQuery JavaScript Ajax library, jQuery 3.3.1 Minified, Materialize Minified JavaScript and Materialize Icons Family (via Google Fonts) used in this video.
Second Step:

Second step about, creating first "modal button (with wave effect)" because we need a clickable modal button for reaching Log In form with pop-up effect, we used modal as a href because modal provides us like alert box with pop-up effect. When we click on the modal button, it will open with the pop-up effect. We used container class because, it allows us to set the page layout for modal Log In button.
We used division class as center align, this class allows the log in modal button to appear in the center of the page. We used here a href command as "#modal" because this button will redirect us to modal log in section with pop-up effect. We defined modal log in button properties with i class command, we used wave effect and we defined wave effect as green. Waves-effect command makes when we click on the button, the button allows the color to turn green and we defined modal buttons primary color as black. And we defined a style for the button to appear in the center of the page. We defined button's margin-top style dimensions as 400px this value will appear this button in the center of the page. And finally we defined the text to write on the button as "Click here to Log In".
Third Step:

In this step we defined division class and id as modal and modal to defining modal login options.
This is Important We can't change id and class because the modals id and class type are standard. We used model-content because this class allows us the specifying log in section options and properties.
We defined the color of welcome message. We also defined the margin-top style value as 25px for the welcome message appear on the center of the page with using h2 command.
Fourth Step:

In this step, we defined a lot of commands and classes for creating log in username and password options. We used input placeholder command, this means, in the username and password text area, input placeholder provides, appear "Enter Your Username" with transparent text and this transparent text disappears when the user starts to write. Other commands and classes, I explained in detail all the commands used for this step in the video tutorial.
Fiveth Step:

This step about creating "Sign In" button. We defined another division class as modal-footer, Modal-Footer is a special command that is only used when creating the modal connection button. Here we used division class as modal-footer because in the second part, modal footer class provides MySQL and phpMyAdmin connection with login button.
And we created sign in button with waves-effect and we defined effect as waves-light to looks better.
Sixth Step:

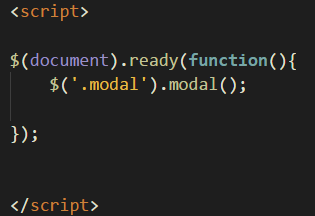
In this step we writing script for log in form, we started with $(document).ready(function(){ command as usual and we used $('.modal').modal(); script we used this function for modal effects and login form to work properly. Also If we don't use the jQuery library, the script and project will not work.
Video Tutorial
Links of Resources
- Materialize Github Repo
- Materialize Web Site
- Materialize Package Download for Windows
- Materialize Minified Ajax CSS Library
- Materialize Minified Ajax JavaScript Library
- Materialize Icon Website
- Materialize Icon Family
- jQuery GitHub Repo
- jQuery Minified Ajax Library (version 3.3.1)
- Visual Studio Code (VSCode) GitHub Repo
- Visual Studio Code Web Site
- Visual Studio Code Download Link for Win x64
- XAMPP Server Web Site
- XAMPP Server(For Windows) Download Link
Curriculum
You can follow the other parts of the materialize education series here! :)

- PART 1: Materialize Education Series Part #1: How to Create a Simple Contact Form Without Using Server and Bootstrap CDN
- PART 2: Materialize Education Series Part #2: How to Create a Full Screen Image Slider Using Carousel with XAMPP Localhost Server From Scratch
- PART 3: Materialize Education Series Part #3: How to Create Side Navigation Bar using Materialize and jQuery Libraries with XAMPP Localhost Server From Scratch
- PART 4: Materialize Education Series Part #4: How to Create Top Navigation Menu (Navbar) using Materialize CSS with XAMPP Localhost Server
- PART 5: Materialize Education Series Part #5: How to Create a Scrollspy Menu using Materialize CSS and jQuery Library with using XAMPP Localhost Server
- PART 6: Materialize Education Series Part #6: How to Create Parallax (Scrolling Image) Website using Materialize CSS and jQuery Library with using XAMPP Localhost Server
Posted on Utopian.io - Rewarding Open Source Contributors

Hey @sargoon
We're already looking forward to your next contribution!
Decentralised Rewards
Share your expertise and knowledge by rating contributions made by others on Utopian.io to help us reward the best contributions together.
Utopian Witness!
Vote for Utopian Witness! We are made of developers, system administrators, entrepreneurs, artists, content creators, thinkers. We embrace every nationality, mindset and belief.
Want to chat? Join us on Discord https://discord.me/utopian-io
Downvoting a post can decrease pending rewards and make it less visible. Common reasons:
Submit
Hi @Sargoon,
Thank you for your contribution. I can see that you are making improvement in the text presentation of the tutorial but the video quality needs to improve.
Your voice over is more difficult to listen to this time and one really needs to concentrate hard. You need to work on your diction and pronunciation so that your words come out clearly. Also the audio needs to improve as your sounds are very faint some time even when the volume is turned to maximum. Spend some time to invest on a better microphone.
As this is 'video tutorial', excellent audio plays a significant role. It is important that learners want to stay engaged as they listen to your speech presentation.
If you have questions, contact us at discord,
Rosa
Need help? Write a ticket on https://support.utopian.io.
Chat with us on Discord.
[utopian-moderator]
Downvoting a post can decrease pending rewards and make it less visible. Common reasons:
Submit
Thank you for your comment. I work on pronunciation and diction to make better contributions, I also work on text and presentation. I ordered a new microphone to make better quality contributions, it will come in this week. Thank you very much for your suggestions, I will consider all your suggestions.
Downvoting a post can decrease pending rewards and make it less visible. Common reasons:
Submit