GitHub Repository
What will I learn ?
- You will learn how to model and simulate dynamic system by Xcos
- How to use blocks builtin in Xcos
Requirements
- Basic programming knowledge
- Basic system modelling knowledge
- Scilab 6.0.1 or higher
Difficulty
- Basic
Tutorial Contents
In the first tutorial, I have briefly explained the usage of Xcos for a control system design and its benefits. In this tutorial, I will be talking about simulating state space model of mass-damper-spring system with the powerful toolbox Xcos. Firstly, I will derive the state space model of mass-damper-spring system. It can be showed as;
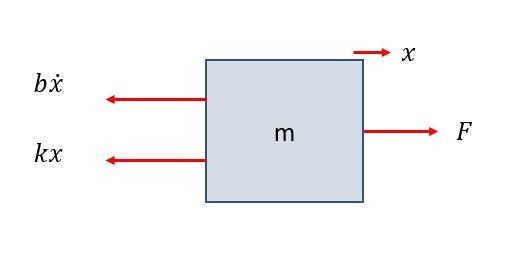
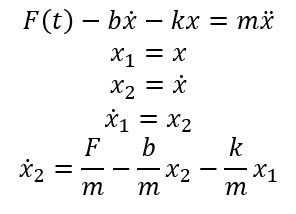
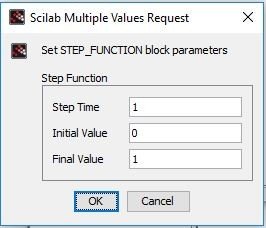
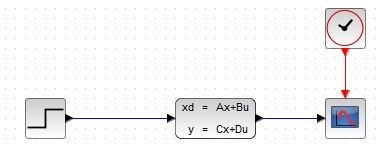
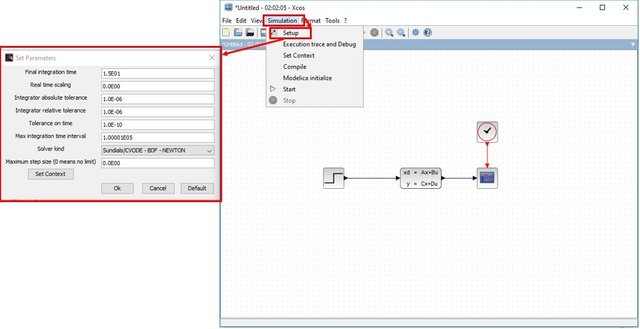
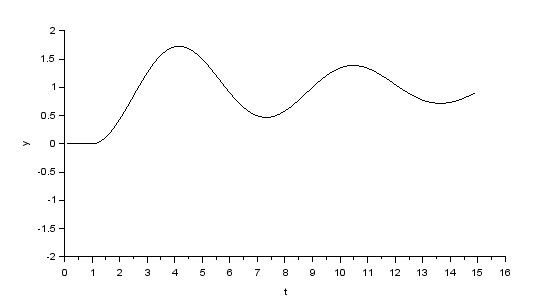
Figure 1: Mass-Spring-Damper System This system is a very common problem to solve. Governing equation of the system is a second order ordinary differential equation. From the Newton's second law of motion it can be derived as; Figure 2: Forces on the mass When we apply Newton's second law of motion to the Figure [2]; Now I will talk about the Xcos blocks that we will use for simulation. Firstly the state space block which is named in Xcos Palette as Figure 3: Xcos Palette Browser We need to provide A, B, C, D matrices, which are obtained from the mathematical model itself, to this block from the workspace of the Scilab. When I use this block, I will explain how we are gonna do it. This block takes the system inputs and outputs the system outpus. In our case, the input will be Force and the output will be displacement. Second block is called Clock and in Xcos Palette Browser it is named as Figure 4: Xcos Palette Browser This block continuously gives time of the simulation as output. For drawing purposes we will need this block. Third block and Fourth blocks are commonly used blocks in simulations. They are called Step Input and Scope blocks and in Xcos they are named as Figure 5: Xcos Palette Browser Step function block is used for generating step input at a specified simulation time. Since we need input for the simulation we will use this block for continuous force generation. Cscope block draws a 2-D plot and input determines the y axis and the red input is the time input and it determines the x axis of this plot. Building System in Xcos Firstly, I will set up the state-space system and simulate it. In order to do this initially we need A, B, C, D matrices defined in the Scilab Workspace. It can be done as; Figure 6: Scilab Console They can be set up by typing in Scilab Console and they will appear in Variable Browser. All the variables defined in the Variable Browser can be used in Xcos with same name. Now open the Figure 7: CLSS block input parameters When double clicked on this block a window will open as shown in Figure [7]. In this window, we will write variable names defined in Variable Browser initially. Moreover, it asks for initial states. For this simulation since we have two variable which are displacement and velocity I have initialize them as 0. After that we will use step input block to give force input to the system. When we double click on this block a window will pop up which is; Figure 8: Step Function Block In this block, Step Time determines the time when output of this block jumps from Initial Value to Final Value. Since I will apply 0 force until first second and after that constant 1 Newton force no need to change any parameter in this block. Now our system will look like; Figure 9: Block Diagram for State Space Now what will this system do is that, state space block takes the input coming from the step function and determines the variable dots and integrates them and generates outputs as variables we want to determine and send to the scope block. Before running the system we need to configure the simulation. Figure 10: Simulation Setup From this parameters simulation time can be set. Set Final Integration Time to 15 in order to set simulation time to 15 seconds. When we run the Xcos, the scope block gives us; Figure 10: State Space Results to a Given 1 Newton Force Results are as we expected the system starts from zero and oscillates. One way of modelling and simulating in Xcos a dynamic system is that. Other way of doing this is using integrating block and more complicated way which will be showed in the next tutorial. I hope this tutorial will be helpful for you guys :) Xcos Program [- Xcos Code] https://drive.google.com/open?id=12AJG2XdGVL2Gka3T7EjQfzPB5u9JCeTY Curriculum [ Tutorial-1] Simple Control System Design with XCOS - Scilab Tutorial References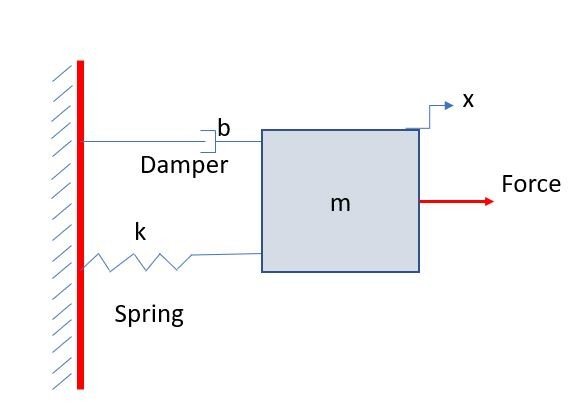
CLSS open the Palette and check for continuous time systems;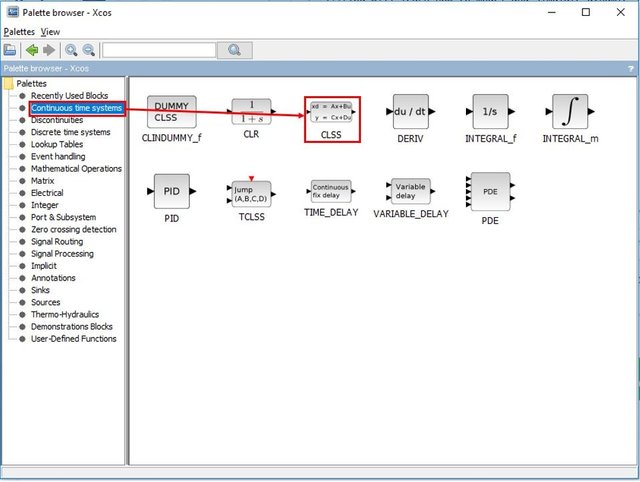
CLOCK_c. When we open the Palette Browser;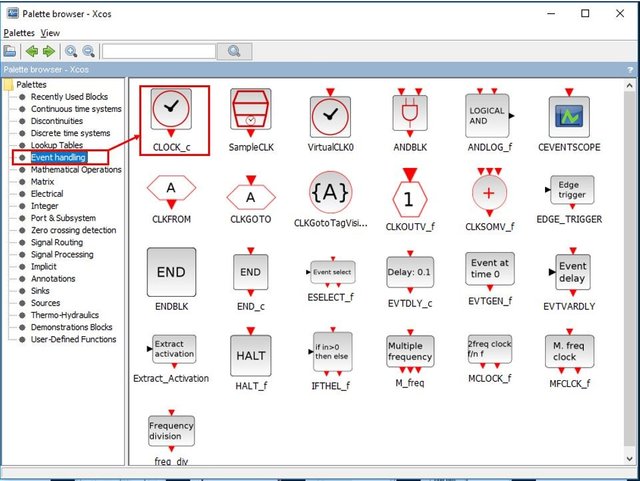
STEP_FUNCTION, CSCOPE. In the Palette Browser they can be found from;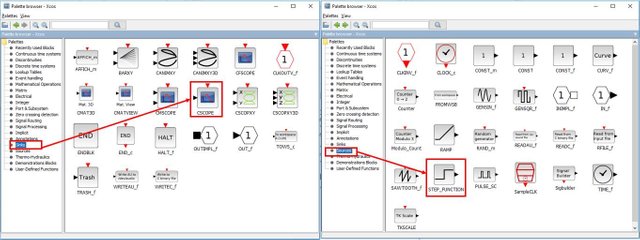

CLSS in Xcos and type variable names;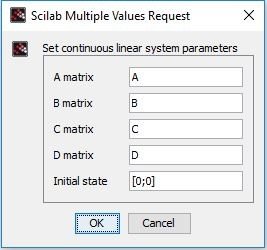
@svozkan, Thank you for your contribution, but it is likely to be discarded because
I will suggest you to go through the utopian guidelines here and use the provided template.
You can still edit your contribution to make it eligible for review.
Downvoting a post can decrease pending rewards and make it less visible. Common reasons:
Submit
Thank you @aneilpatel for your kind comments. I added the GitHub Repo to the tutorial. I think code does not need to be provided in a GitHub repo since it is not a Development that's why I uploaded it to a drive. Anyway, thank you for your feedback :)
Downvoting a post can decrease pending rewards and make it less visible. Common reasons:
Submit
Those points are essentially guidelines, but all are great to have in a tutorial and very helpful, good comment overall @aneilpatel !
@svozkan a moderator will officially review your contribution and provide further feedback.
Downvoting a post can decrease pending rewards and make it less visible. Common reasons:
Submit
Hey @aneilpatel
Here's a tip for your valuable feedback! @Utopian-io loves and incentivises informative comments.
Contributing on Utopian
Learn how to contribute on our website.
Want to chat? Join us on Discord https://discord.gg/h52nFrV.
Vote for Utopian Witness!
Downvoting a post can decrease pending rewards and make it less visible. Common reasons:
Submit
Thank you for your contribution.
In tutorials category, contributions are rewarded based on the aspects they teach about the project and the value they bring to the project they contribute. Therefore, I suggest increasing the volume of the content related with the project itself, or instead of covering one concept per post you can provide more topics in one post to increase the quality your contributions.
Additionally, giving extra details about the functionalities of XCOS will make your contribution denser which would be really great.
I think your future contributions in the series will be much better with these improvements.
Your contribution has been evaluated according to Utopian policies and guidelines, as well as a predefined set of questions pertaining to the category.
To view those questions and the relevant answers related to your post, click here.
Need help? Write a ticket on https://support.utopian.io/.
Chat with us on Discord.
[utopian-moderator]
Downvoting a post can decrease pending rewards and make it less visible. Common reasons:
Submit
Hey @roj
Here's a tip for your valuable feedback! @Utopian-io loves and incentivises informative comments.
Contributing on Utopian
Learn how to contribute on our website.
Want to chat? Join us on Discord https://discord.gg/h52nFrV.
Vote for Utopian Witness!
Downvoting a post can decrease pending rewards and make it less visible. Common reasons:
Submit
Hey @svozkan
Thanks for contributing on Utopian.
We’re already looking forward to your next contribution!
Contributing on Utopian
Learn how to contribute on our website or by watching this tutorial on Youtube.
Want to chat? Join us on Discord https://discord.gg/h52nFrV.
Vote for Utopian Witness!
Downvoting a post can decrease pending rewards and make it less visible. Common reasons:
Submit