In the last step we selected a font, and changed the default character style. In the next step, we will talk a bit more on how many fonts to use, and why, as well as establishing the styles we need to create an appealing layout.
Why one font only?
This is just a suggestion. You can use two, or even three fonts - depending on where they are used. For example: Chapter titles are usually written in a bigger font. This font may differ from the one in the rest of the text (like the heading on busy.org for example). The difference is subtle enough, that you might not notice it right away - and that is the reason why you need as little different fonts as possible. After all, you want your reader to enjoy what you have written, not the thousand different fonts you have found (or even created).
When to use more than one font
These guidelines are, of course, only guidelines. Sometimes it can be a good idea to change the font for a paragraph, or for someone who speaks. The latter can help give the speaking character's voice a certain tone, that you just can't describe. If you play (or have already played) Undertale, you might have noticed, that the character sans is the only character that uses "Comic Sans" as font for their speech, and Papyrus uses ... "Papyrus". In this case these goofy fonts add something to the character of both. Especially when Sans is getting serious all of a sudden, using a different font.
In print you should do this at most with one character, or not at all. Done once, it can add to the text, overdone it gets boring and the text just becomes harder to read.
In the german book "Die 13 1/2 Leben des Käpt'n Blaubär" (the 13 1/2 lives of Captain Bluebear - I am not sure if there is an official translation), this technique is used to highlight some Encyclopedic entries that describe more of the world the character is in - and ties deeper into the story as well.
As with all things: Done in moderation it can be fine, even add to the story. Overdone, and it just hurts.
Plan the styles you need
Scribus is different from a word processor: It is easier to set styles than to change the properties of the text on the fly.
Defininf styles has the advantage, that you can easily change the looks of the whole text with just a few simple clicks. There are still a few things you might have to do at chapter breaks, but that will be discussed at a different time.
Styles to create
We need to focus on two styles only: Paragraph Styles and Character Styles. You may add Line Styles depending on whether you'd like to have a few accents on the page, but this shouldn't be necessary for a simple novel.
Chapter-Heading
The way you style the Chapter-Heading is up to you. It can be just a big number, it can be "Chapter", followed by the number. You may name the chapters or not. You can start at the absolute Top, or only after one third of the page. You can be creative, but remember that less is often more.
Open the Style-Manager in Scribus (Click Edit and then Styles... in the Menu). Click New and then Paragraph Style.
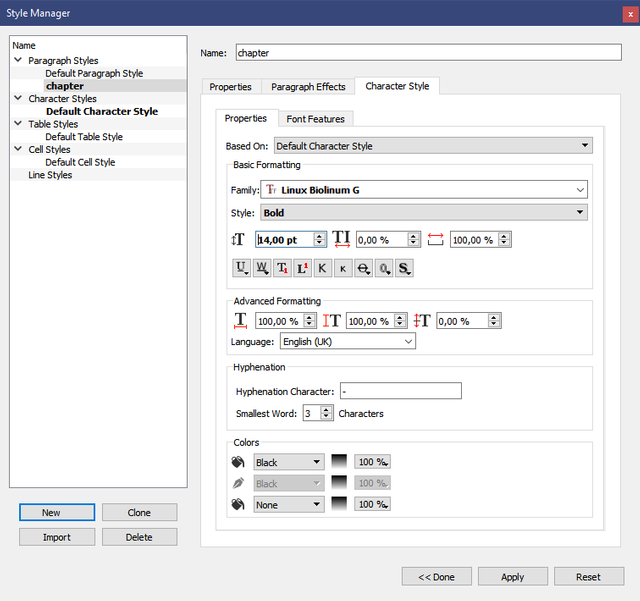
You are prompted to name the new style. Use a good descriptive name, for example chapter. These names are for you. You can name them any way you want, and you don't need to adhere to grammar.
Below the name field are three more tabs. Click on Character Style - Every Paragraph Style has an associated Character Style. There will be even more Tabs below that, but we are interested in the field Based On:. Every Character Style you have defined will be shown here. The Formatting is already based on the Default Character Style we set last time, I suggest to select it anyway.
In the Basic Formatting area, set Style to Bold, and the Size below to 14. You will notice that Scribus prints the changed options in a bold font. These Style-options are now tied to the Paragraph Style, and won't change to reflect changes you made to the Default Character Style.

Example: Later on, you desire to change the font to Lato, 9pt, for example. In addition to that you desire a larger space between printed characters (the field next to the text-size), at 10%. The Paragraph Style will now change to adhere to the new style, keeping the larger space between the characters. But the font-family, -style and-size will stay the same as before as they have been explicitly changed.
Go back to the upper Properties Tab. As Alignment, you can choose center (Second Button), add a margin below, and you are done. You can experiment a bit more later.
Italics
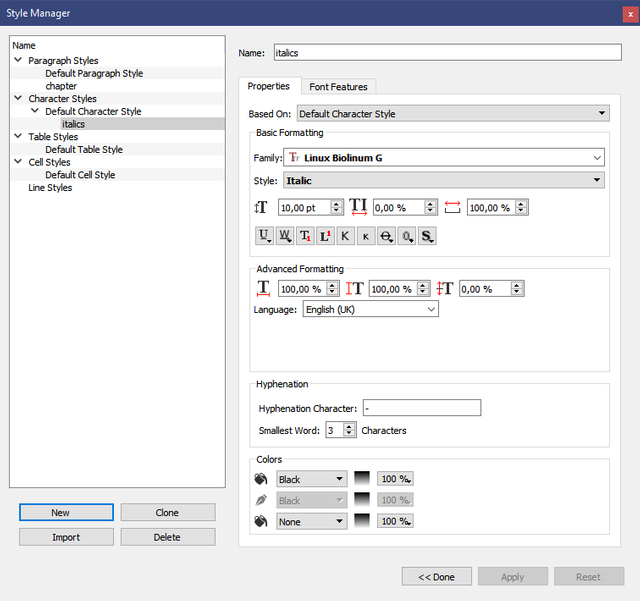
As some like to print thoughts of (some) Charachters in italics, you should add new Character Style. In the Style Manager Window click New Select Character Style and name it italics. On Properties under Based On Select once more Default Character Style. Then Below Family select the apropriate Italic style, and hit Apply.

Default Paragraph Style
Right now, if we were to enter our Text into Scribus, we would get a wall of Text on the page. It isn't as easy to read as we'd like it to be. In Online Publications, like on Steemit, or Busy, we add a white line below each paragraph. This makes it easier to read. Doing that in a book doesn't only look silly, but it would also add tremendously to the page count. Therefore every paragraphs first line gets an indentation.
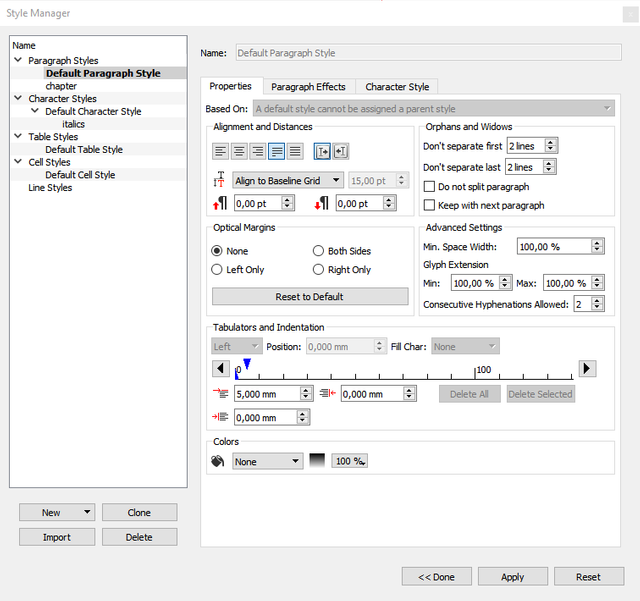
In my opinion, 5 mm should work fine, or about a quarter inch (0.2 to 0.25 inch).Select the Default Paragraph Style. In the section Tabulators and Indentations Set the very first numberfield to 5 mm (or the number you desire).
Next go to the Section Alignment and Distances and set the linespacing (the drop down field) to Align to Baseline Grid - we will look into that in another post. Set text-alignment either to left (first button), or justified, last line in a paragraph left (fourth button).
Last go to the Sections Orphans and Widows. Set Don't seperate first to 2 lines. Doe the same for Don't seperate last. This will prevent pages ending with only the first line of a new paragraph, as well as pages starting with only the last line of a new paragraph. These phenomenons are called Orphan and Widow respectively. (Fun fact: The german words are far less nice). Your window should look something like this:

Hit Apply, close the Window and save. In the next part, we will look into the Baseline Grid, and how to add page numbers. See you then