Zenbot è un bot per il trading di criptovalute da riga di comando che utilizza Node.js e MongoDB.
È dotato di:
- Fully-automated technical-analysis-based trading approach
- Full support for GDAX, Poloniex, Kraken, Bittrex, Quadriga, Gemini, Bitfinex, CEX.IO and Bitstamp, work on further exchange support is ongoing.
- Plugin architecture for implementing exchange support, or writing new strategies
- Simulator for Backtesting strategies against historical data
- "Paper" trading mode, operates on a simulated balance while watching the live market
- Configurable sell stops, buy stops, and (trailing) profit stops
- Flexible sampling period and trade frequency - averages 1-2 trades/day with 1h period, 15-50/day with 5m period
Bene, ora passiamo all'azione
Di seguito sono elencati i passi per installare MongoDB, Node.js e finalmente ZenBot.
Questa guida utilizza una macchina virtuale creata con VirtualBox, software open source e disponibile per tutti i sistemi operativi.
> Prerequisiti
- Debian 9 Stretch installata e pronta
- Ram 1GB
- Disco 10GB
> Preparazione
- Aggiornare il sistema:
$ sudo apt-get update && sudo apt-get upgrade -y - Installare i tool di base:
$ sudo apt-get install git
$ sudo apt-get install build-essential
$ sudo apt-get install curl
> MongoDB
- Installare MongoDB:
$ sudo apt-get install mongodb - Verificare l’installazione:
$ mongo --host 127.0.0.1:27017
PS: per uscire dalla shel di mongodb che si aprirà basta digitare exit e premere invio
OUTPUT
MongoDB shell version: 3.2.11
connecting to: 127.0.0.1:27017/test
> exit
bye
> Node.js
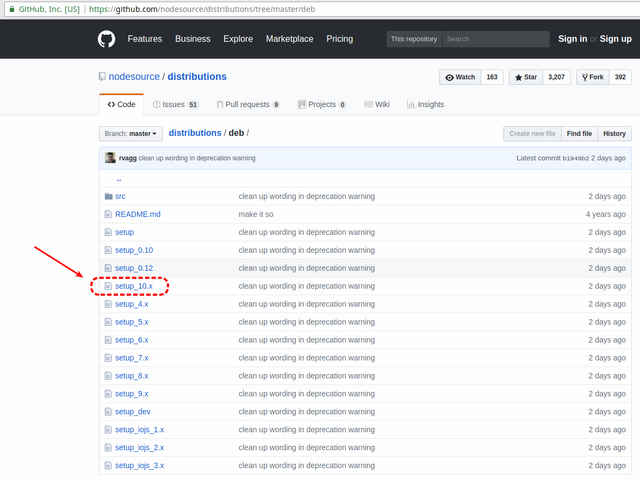
- Scegliere la versione da installare qui (version 8.3.0 or higher): https://github.com/nodesource/distributions/tree/master/deb (Node.js Binary Distributions) ;

- Scaricare ed eseguire lo script scelto:
$ curl -sL https://deb.nodesource.com/setup_10.x | sudo -E bash - - Installare nodejs:
$ sudo apt-get install -y nodejs
> ZenBot
- Scaricare con git il pacchetto :
$ git clonehttps://github.com/deviavir/zenbot.git - Spostarsi nella directory appena scaricata:
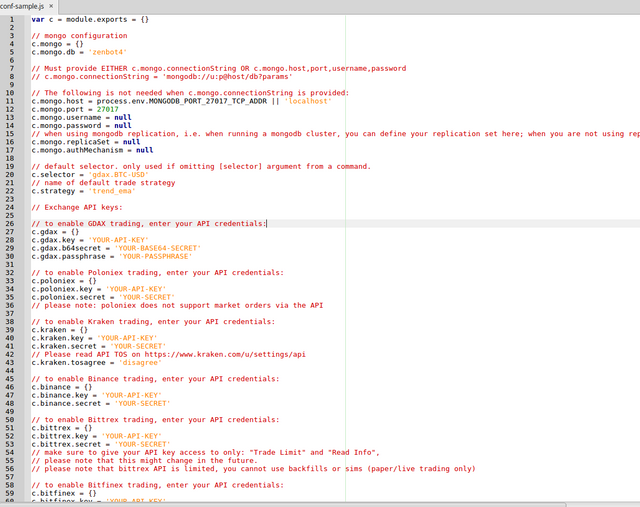
$ cd zenbot - Creare il file di configurazione:
$ cp conf-sample.js conf.js
Create your configuration file by copying conf-sample.js to conf.js:
- View and edit conf.js.
- It's possible to use zenbot in "paper trading" mode without making any changes.
- You must add your exchange API keys to enable real trading however.
- API keys do NOT need deposit/withdrawl permissions.
- Fare una configurazione minima del file conf.js appena creato modificando solo l'indirizzo ip e la porta della Web GUI:
// REST API
Rc.output.api = {}
c.output.api.on = true
c.output.api.ip = '0.0.0.0' // INDIRIZZO IP della macchina dove gira il bot
c.output.api.port = 0 // PORTA di ascolto - Installare Zenbot come modulo di Node.js:
$ npm install
PS: se non modificato su conf.js questa l'installazione creerà su MongoDB un database di servizio di nome zenbot4 - Lanciare la post installazione:
$node post_install.js - Testare l’installazione:
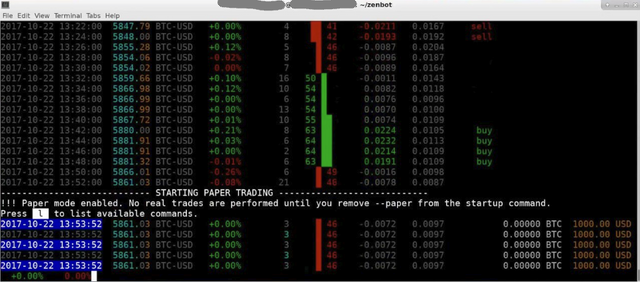
$ ./zenbot.sh trade --paper
- questo comando avvia il bot in modalità paper (i comandi cioè non vengono veramente effettuati).
- il selettore di default se non si specifica è gdax.BTC-USD (Exchange GDAX ; pair BTC/USD)
- la strategia di default se non si specifica è trend_ema (con 2m period)
- il bot prima di visualizzare le attività in corso, scarica i dati del selettore (impiega qualche minuto)
- digitare CONTROL-C per fermare il test
Congratulations @nedludd! You received a personal award!
Click here to view your Board
Downvoting a post can decrease pending rewards and make it less visible. Common reasons:
Submit
Congratulations @nedludd! You received a personal award!
You can view your badges on your Steem Board and compare to others on the Steem Ranking
Vote for @Steemitboard as a witness to get one more award and increased upvotes!
Downvoting a post can decrease pending rewards and make it less visible. Common reasons:
Submit