"What are you using it for?"

"To learn!" should be your stock response.
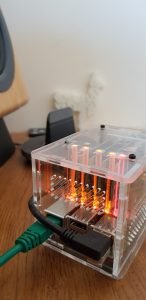
I purchased the Clusterhat a while back as a scaled-down version of FrankenPi although given the age of FrankenPi the scale of Clusterhat has more to do with physical size than computing ability. To be honest I suspect Clusterhat is as powerful if not more so if I could only be bothered to do a benchmark test on both projects to find out. Obviously there are literally hundreds of uses for Clusterhat and a multitude of ways to configure it, personally, I like Docker Swarm mainly because it is so simple to install and easy to set up.
I wrote this mainly as a walkthrough for myself, there's no particular order to set up Storage and Docker I just prefer to do it this way. If you choose to follow what I've written here you do so at your own risk. This walkthrough comes with no support whatsoever. "If you break it you get to keep all the pieces."
Setup shared storage device

Most of us have a USB storage device slung at the back of a drawer somewhere. You don't need to have it but it will come in handy sometimes. To find out where the storage device is loaded in /dev, we need to run the lsblk command:
$ lsblk
The output should look something like this.
NAME MAJ:MIN RM SIZE RO TYPE MOUNTPOINTsda 8:0 1 28.9G 0 disk
└─sda1 8:1 1 28.9G 0 part /media/storage
mmcblk0 179:0 0 14.9G 0 disk
├─mmcblk0p1 179:1 0 256M 0 part /boot
└─mmcblk0p2 179:2 0 14.6G 0 part /
I had already formatted my drive but you may wish to use the mkfs.ext4 command. Just make doubly sure you are formatting the correct drive: "You wipe it, you lose it!"
sudo mkfs.ext4 /dev/sda1I generally use /media for mounting external drives, but you can place the folder anywhere on your filesystem. Make sure you use the same folder across all of your nodes!
Let's go ahead and create the folder where you will mount the storage device.
sudo mkdir /media/Storagesudo chown nobody.nogroup -R /media/Storage
sudo chmod -R 777 /media/Storage
"Warning!"
This drive has the dangerous 777 full permissions set, anyone who has access to your Raspberry pi will be able to read, modify, and remove the contents of the storage device. I'm doing it this way because I know only I will have access If you are using the cluster in a production environment you will need to use different permissions to the ones I have.
Now we need to run the blkid command so we can get the UUID of the drive. This will enable us to set up the automatic mounting of the drive whenever the pi is rebooted. The output will look similar to this:
/dev/sda1: UUID="ff26ae00-4289-4acc-95a4-35d37c6a0c27" TYPE="ext4" PARTUUID="7a6687b0-01"The information you are looking for is:
UUID="ff26ae00-4289-4acc-95a4-35d37c6a0c27"Now we need to add the storage device to the bottom of your fstab.
"Warning!"
Make sure you substitute your drives UUID and not the one in this guide. We've all done it but copy-n-paste can be dangerous sometimes.
sudo vim /etc/fstabUUID=ff26ae00-4289-4acc-95a4-35d37c6a0c27 /media/Storage ext4 defaults 0 2
Now let's install NFS server if you haven't already done it.
sudo apt-get install -y nfs-kernel-serverNow we'll need to edit /etc/exports and place the following at the bottom:
sudo vim /media/Storage172.19.181.0/24(rw,sync,no_root_squash,no_subtree_check)
"Warning!"
If you used the CBRIDGE image, you'll need to use the IP address of your network. So if your network is using 192.168.1.0 you'll need to change the 172.19.181.0 to 192.168.1.0 in the command I gave.
Next up we need to update the NFS server:
sudo exportfs -aNow to add the storage device to each of the Nodes (Pi Zero's) This is pretty much the same procedure we have already completed.
"Warning!"
Remember what I said earlier about CBRIDGE & NAT and changing IP's
sudo apt-get install -y nfs-commonsudo mkdir /media/Storage
sudo chown nobody.nogroup /media/Storage
sudo chmod -R 777 /media/Storage
You will need to add a slightly different entry to the bottom of fstab on each and every Node (Pi Zero)
sudo vi /etc/fstab172.19.181.254:/media/Storage /media/Storage nfs defaults 0 0
Now let's run:
sudo mount -aIf you have any errors, double check your /etc/fstab files in the nodes and the /etc/exports file on the controller.
Next, create a text file inside the NFS mount directory /media/Storage to ensure that you can see it across all of the nodes (Pi Zero's). To confirm it's working do:
echo “Please work” >> /media/Storage/test.txtFingers crossed:
cat /media/Storage/test.txt"Please work"Let's install Docker
My Clusterhat HostnamesHost - pi0
↳Node - p1
↳Node - p2
↳Node - p3
↳Node - p4
Starting with the Clusterhat Host, in my case pi0 I first like to make sure the system is up to date before I begin.
sudo apt-get update && sudo apt-get upgrade -yNow we'll fetch and install Docker.
sudo curl -sSL https://get.docker.com | shNow we'll add (in my case) the user pi to the group Docker:
sudo usermod -aG docker piYou'll need to repeat this on all the Nodes (Pi Zero's)
Now let's advertise your Host (Manager, main machine whatever you like to call it)
sudo docker swarm init --advertise-addr 192.168.1.18Docker Swarm needs a Quorum so let's add a couple more managers by generating a "join" token:
sudo docker swarm join-token managerThis will output something similar to this:
docker swarm join --token SWMTKN-1-03zr59oxg229jf7wpior8nkuoasj7e59qkgk0on37zvgkoo4av-4gdx5zuihs60jwzrbhigw79iz 192.168.1.18:2377Now we need to ssh into p1.local and paste the output into a Terminal. Docker should report back that p1.local has joined as a manager. ssh into p2.local and repeat the process. We now have three Managers pi0, p1 & p2 forming our Quorum.
Next we must create some workers:
sudo docker swarm join-token workerThis will output something similar to this:
docker swarm join --token SWMTKN-1-03zr59oxg229jf7wpior8nkuoasj7e59qkgk0on37zvgkoo4av-26dvf5ou5p8w2lab3tat3epmn 192.168.1.18:2377ssh into p3.local and p4.local respectively and paste that output into a Terminal on each Node (Pi Zero)
Now nip back to the Host pi0 and see if everything is OK:
sudo docker node lsDocker should report back something similar to this:
| ID | HOSTNAME | STATUS | AVAILABILITY | MANAGER STATUS | ENGINE |
| uckdf3wgwkq10p1zalkocfr3q | p1 | Ready | Active | Reachable | 19.03.11 |
| kch2n7afiuvi7cry98biz6332 | p2 | Ready | Active | Reachable | 19.03.11 |
| b0hgrd23guaif81ipl39iysf8 | p3 | Ready | Active | 19.03.11 | |
| nl4hlfi7qsdljilw6j21q0be4 | p4 | Ready | Active | 19.03.11 | |
| 15kmve4bm3x7z7e1yz2h3pw4a | * pi0 | Ready | Active | Leader | 19.03.11 |
Let's do something with it
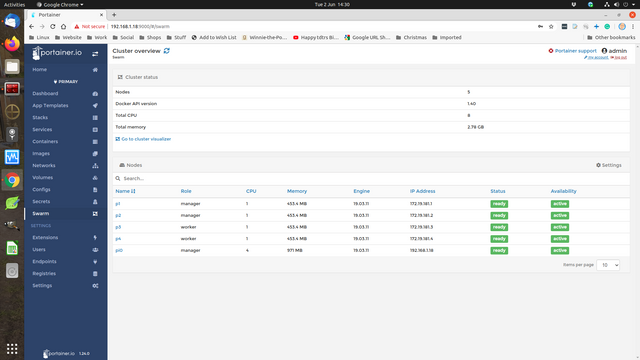
Now you've built your lovely Docker Swarm you'll want to run a service on it. You could install Visualizer but it doesn't do a lot other than give you a visual overview of what containers and services you have. I like Portainer, not only does it give you full control but also in-depth information as well as including, yes, visualizer.
On our Host machine (In my case pi0) do:
curl -L https://downloads.portainer.io/portainer-agent-stack.yml -o portainer-agent-stack.yml
I'd love to talk to you about .yml which is used by Ansible for playbooks but that's for another day.
Next we'll deploy Portainer in our Swarm:
docker stack deploy --compose-file=portainer-agent-stack.yml portainer
Wait a few moments for the service to propagate across your cluster (it's literally seconds) and then in the browser of your choice type the ip address with port 9000 for your host (pi0) in my case 192.168.1.18:9000
You will be asked to set an Admin password and will then be logged in. It took a few moments for the information of the cluster to be probed by Portainer but eventually we were happy bunny's.


My actual name is Pete
Find out Here why I have the username dick_turpin.
Find me on Social Media
 |
https://mastodon.org.uk/@dick_turpin |
|
|
https://twitter.com/dick_turpin |
 |
https://www.facebook.com/peter.cannon3 |
This work is licensed under a Creative Commons Attribution 4.0 International License.
License explained: Examples
Create your license: Choose


Wow, multiple nested frames!
Less and less people using Steem, but if you can make something then go for it. The auto-vote most people used has shut down and lots of us have powered down, so votes are worth less. I'll be more or less out in 2 weeks.
Downvoting a post can decrease pending rewards and make it less visible. Common reasons:
Submit