 |
|---|
Hello friends welcome to another interesting challenge which I have participated in as given by professor @kouba01. In this, I will be showing you how to add background colors of different types to HTML files using CSS based on the exercise of the challenge.
Apply a dark gray background to the entire document and fuchsia pink text color by default and center the titles
Here the first thing that I did was to create two separate files: index.html and styleTP.css and set them appropriately to get the correct result to make it more beautiful I added an image into the HTML file. The screenshots below show how I set up the two files.
| index.html |
|---|
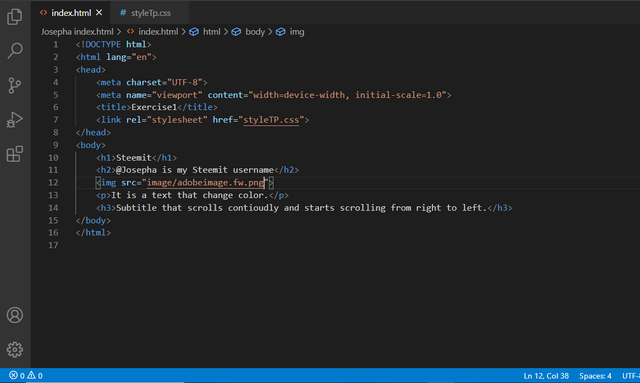
This is part of the file that contains the structure and content of my webpage.
| styleTP.css |
|---|
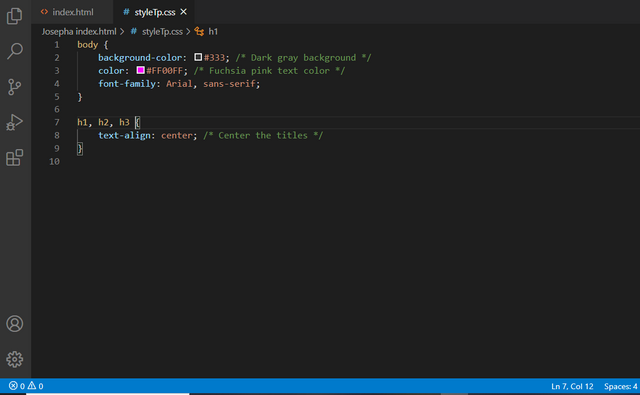
This is part of the file that contains the styling of the webpage as shown in the index.html part.
| Output |
|---|
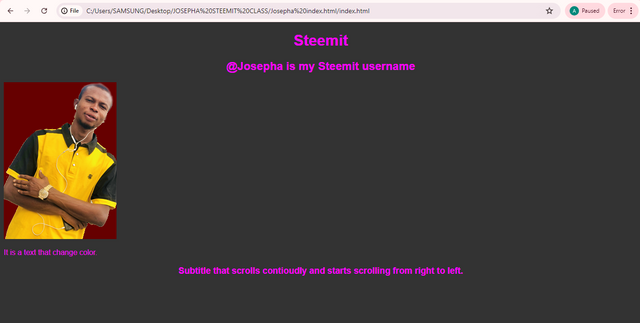
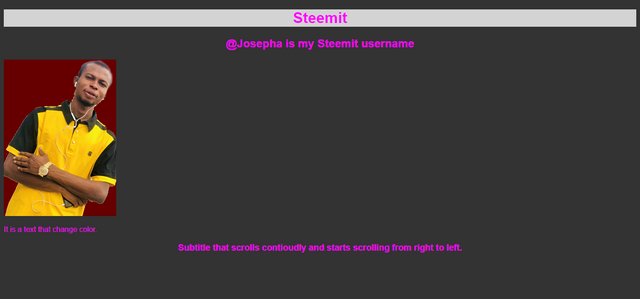
This is the part that shows the results of both the index.html and styleTP.ccs parts.
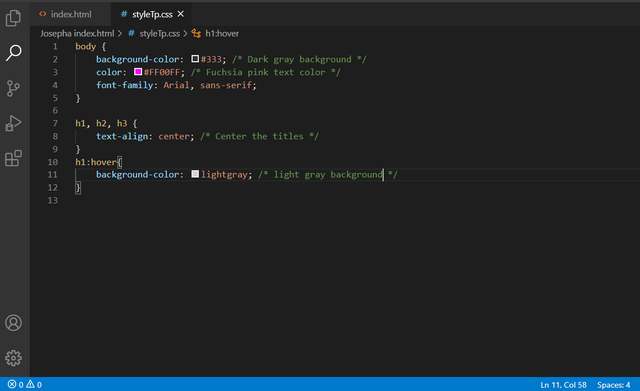
Apply a light gray background When you move the mouse cursor over the page title
Here I applied a light gray background to the page title Steemit. on the styleTP.ccs part, which can only work if I move the mouse cursor over the page title.
| styleTP.css |
|---|
| Output |
|---|
Apply a double fuchsia color border to the image, an image width of 75%, and an automatic image height and rounding of images by 50% in the top left and bottom right corners
Here at this point, it is the image that I applied a double fuchsia color border on and also, an image with 75% with an automatic image height which is auto. I also added a round border of the image by 50% in the top left and bottom right corners as seen in the styleTP.ccs part shared in the below screenshot.
| styleTP.css |
|---|
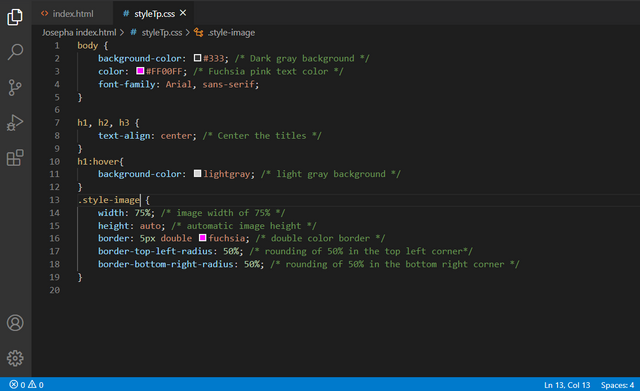
The class="styled-image" attribute is what I used to apply specific styles to the image on the styleTP.ccspart.
| Output |
|---|
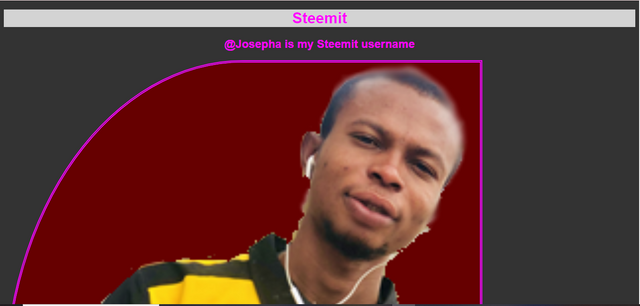
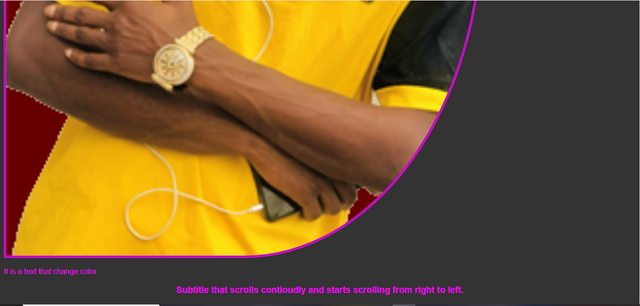
When you approach the mouse cursor over an image a transition is triggered allowing you to move its rounding towards the top right and bottom left corners. This transition has a one-second wait before triggering. It lasts 3 seconds and is fast at the beginning and decelerates at the end.
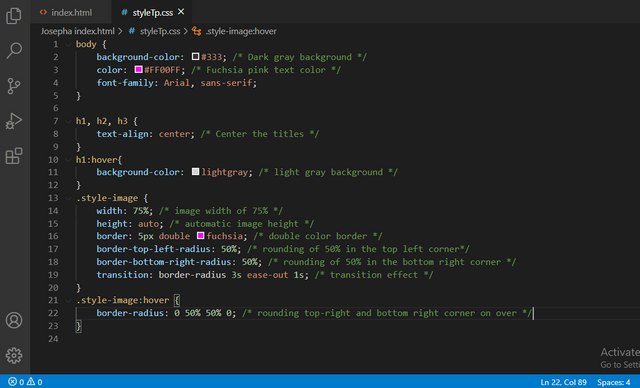
At this point, I still maintain the index.html code the way it is already and focus on the styleTP.ccs part which in my class of image style-image, I added a transition that will trigger one second of wait and then the last for 3 seconds if the mouse is removed from the image. In the h1: hover class I added a border-radius for the top left and bottom right to the zero so when we move to mouse the image, the border will return to 0 which means the border-radius has no effect.
| styleTP.ccs |
|---|
| Output |
|---|
To make you understand what we are doing I had to make a screen recording video which was uploaded on my YouTube channel before uploading it here on Steemit for you to see.
An animation is performed for the text. It consists of changing the font color and the background color.
| index.html |
|---|
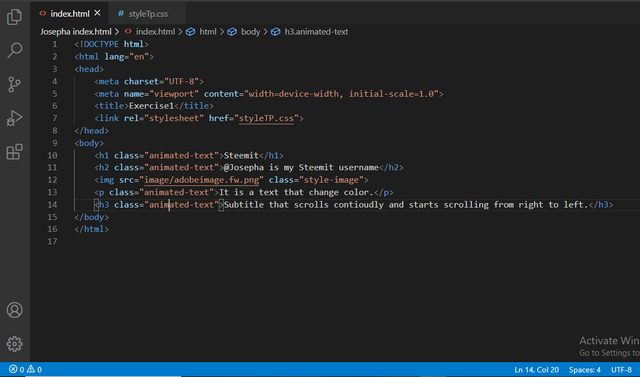
At this point, I added classes in the p tage and to the last title tag h3as animated-text
| styleTP.ccs |
|---|
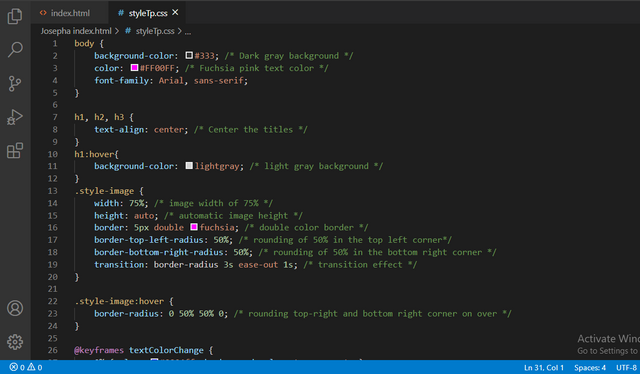
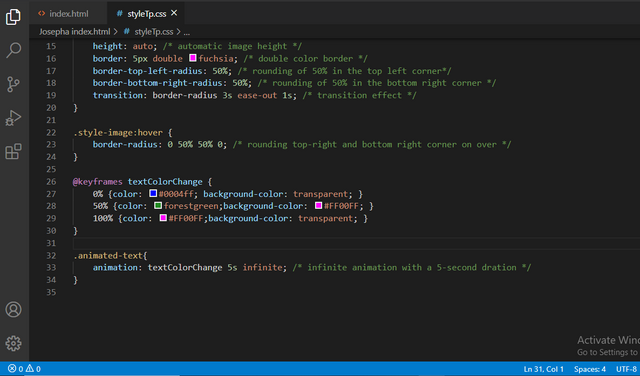
In the CSS part, I only put comments. The style of the image has already been stated after I then used keyframes to control the animation sequence. I also used color to change the background and font colors of the paragraph text. Align change is what I use for the keyframe to control the sequence of the title from the right side to the center and left side.
| Output |
|---|
Structure of Page to have Image Gallery in HTML5 and CSS3 Code.
| HTML5 |
|---|
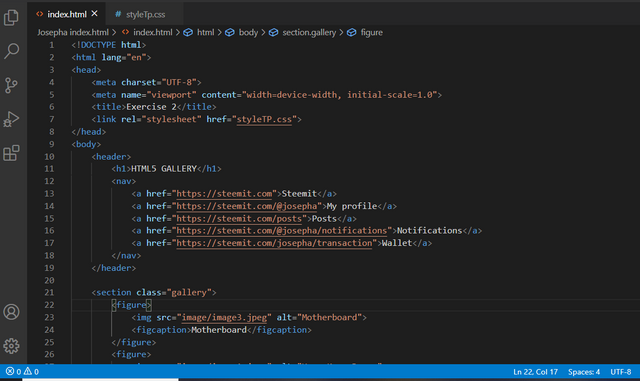
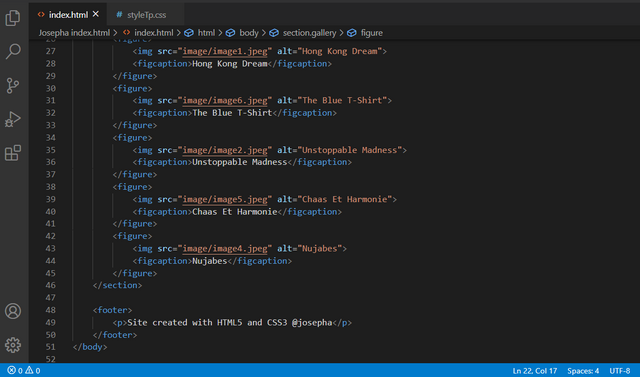
In this exercise 2, I created a new HTML5 and CSS3 which as for the HTML5 I created: Babbar, section, basic layout, and footer. I also added minute links and named them using my Steemit profile name. The footer side is where I wrote my username.
| CSS3 |
|---|
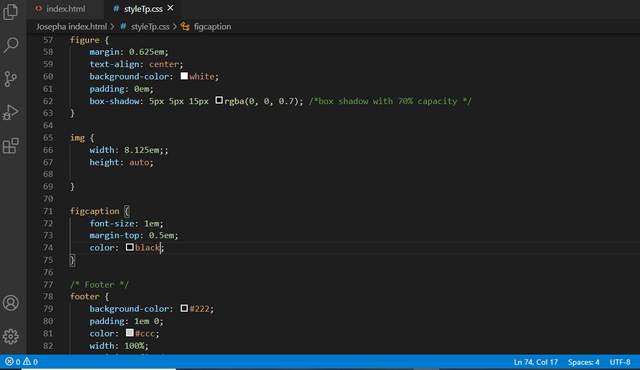
In this CSS3 part, I added a layout design for the basic website head, NAV section, and footer first. Also, I added a div and adjusted it using figure and alignment for the image. Finally, I then converted all the px to em using W3Schools converted.
| Output |
|---|

| CSS Shading |
|---|
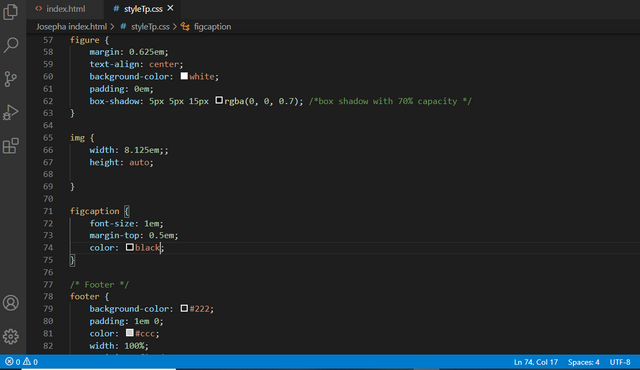
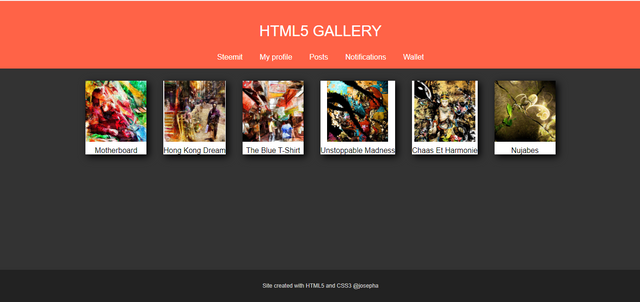
Here I will be adding shadow to the work which I have already done as shown in the image below.
| Output |
|---|
| CSS Rotation |
|---|
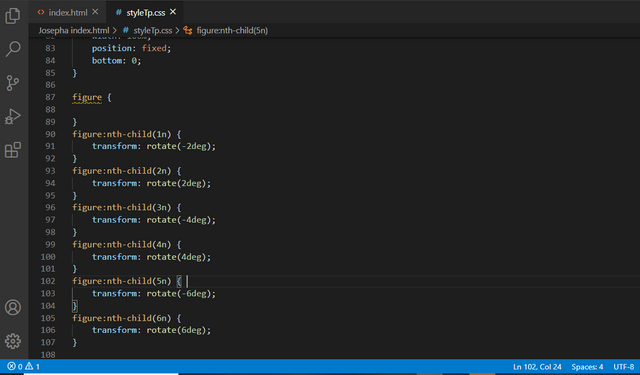
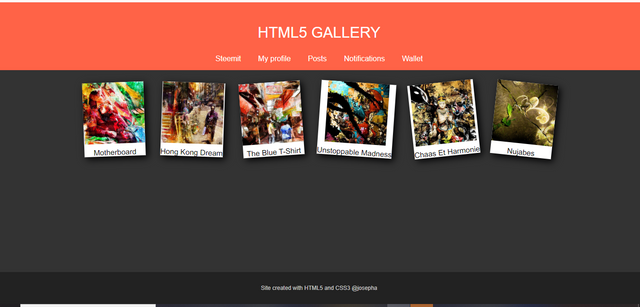
At this point, I made use of the pseudo-class of CSS3 with selector nth-child and one element for each of the 6 images for the rotation. Before doing this I give a class name to all 6 images. Below is the code.
| Output |
|---|
| CSS Animation |
|---|
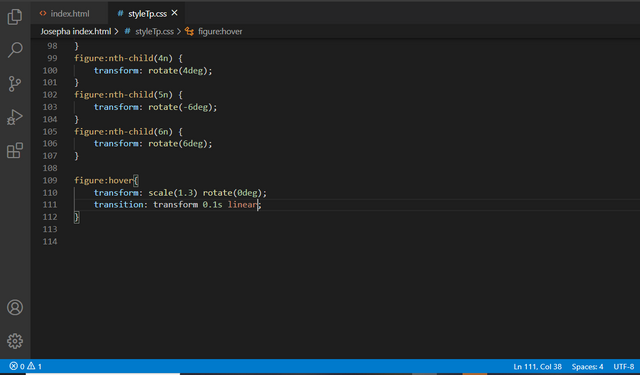
As for the animation, it is an animation property that I used to transform. The code that I used is transition: transform 0.
1s linear. I used 100mil second linear animation which you can see from the above code.
| Output |
|---|
For clarity, I uploaded the output of the animation on my YouTube channel, before sharing the video link here with you.
I am inviting: @dove11, @pelon53, @simonnwigwe, and @dave-hanny
Best Regards,
Dynamic Devs Team
@kuba01
@starrchris
Disclaimer
All images that are used in this post are products of mine which were gotten as a screenshot and saved with my username along with the file name.
There are so much to learn from you, you are a great teacher👏👏👏
Downvoting a post can decrease pending rewards and make it less visible. Common reasons:
Submit
Learning never get stop in our lives. Thank you for stopping by.
Downvoting a post can decrease pending rewards and make it less visible. Common reasons:
Submit
Hello @josepha,
I really enjoyed your post. Your detailed explanation of using CSS for styling HTML is clear and easy to follow. I appreciate how you created separate HTML and CSS files to organize your code effectively. The way you applied different background colors and text styles a solid understanding of CSS.
I especially liked the hover effects you used to change the background color and the creative way you styled the image borders with fuchsia color. Your use of transitions and animations to smoothly adjust image corners and text colors adds a dynamic touch to the design.
The screenshots you provided make it easy to visualize the results, and the video links are a great way to see the effects in action.
Thank you for sharing your work in such a detailed manner. Keep up the great effort🤗🌸💐💖🌼
Downvoting a post can decrease pending rewards and make it less visible. Common reasons:
Submit
Thank you so much. One good thing about what we are doing is that it makes us to learn, and exposes us to new knowledge. Thank you for your support.
Downvoting a post can decrease pending rewards and make it less visible. Common reasons:
Submit
Greetings brother you done your job in a perfect way. The way you present through YouTube embedded link is outstanding and it is comfortable to understand. Your present all the points as mentioned in task. With the help of our teachers you are a professional web developer in future. I wish you more success.
Downvoting a post can decrease pending rewards and make it less visible. Common reasons:
Submit
Thank you brotherly. Indeed it is an interesting challenge.
Downvoting a post can decrease pending rewards and make it less visible. Common reasons:
Submit
Thank you for inviting me. I wish you the best for this contest but as a rule, I do not participate in any contest with a subject I don't know deeply. I have only workable knowledge about this topic.
Downvoting a post can decrease pending rewards and make it less visible. Common reasons:
Submit
It is a good thing that you have workable knowledge in the subject sir. Thank you for stopping by.
Downvoting a post can decrease pending rewards and make it less visible. Common reasons:
Submit
Greetings @josepha, how are you?
I just read your code and check design, you have done exercise 1 as per was asked in the homework. You have applied gray background when mouse hover on title. Also you have added the double border radius with asked percentage of 50% on top left and bottom right corners.
The video you shared of exercise 1 explained the output of your code. Your video on Exercise 2 is also showing the output of the gallery. I love your outputs :)
Downvoting a post can decrease pending rewards and make it less visible. Common reasons:
Submit
Thank you sir, and I must say that you also did well in your entry also.
Downvoting a post can decrease pending rewards and make it less visible. Common reasons:
Submit
Upvoted. Thank You for sending some of your rewards to @null. It will make Steem stronger.
Downvoting a post can decrease pending rewards and make it less visible. Common reasons:
Submit
TEAM 2
Congratulations! This post has been voted through steemcurator04. We support quality posts, good comments anywhere and any tags.Downvoting a post can decrease pending rewards and make it less visible. Common reasons:
Submit
Thank you for the invitation dear friend. You are indeed very good in this and I admire your work so much. After spending some time to go through the video you made and the codes you have uploaded, I saw that it took you a lot to bring out this piece. It is indeed very educative and I wish you the very best.
Downvoting a post can decrease pending rewards and make it less visible. Common reasons:
Submit
Hello sir. Greetings to you
Thanks for sharing your work with us. Going through your work I see a clear step by step demonstration of each step. Equally your codes are visible and easy to read. I did learn a lot from it as a beginner.
Downvoting a post can decrease pending rewards and make it less visible. Common reasons:
Submit
I appreciate your support and I am pleased to know that you learn something useful from my post.
Downvoting a post can decrease pending rewards and make it less visible. Common reasons:
Submit