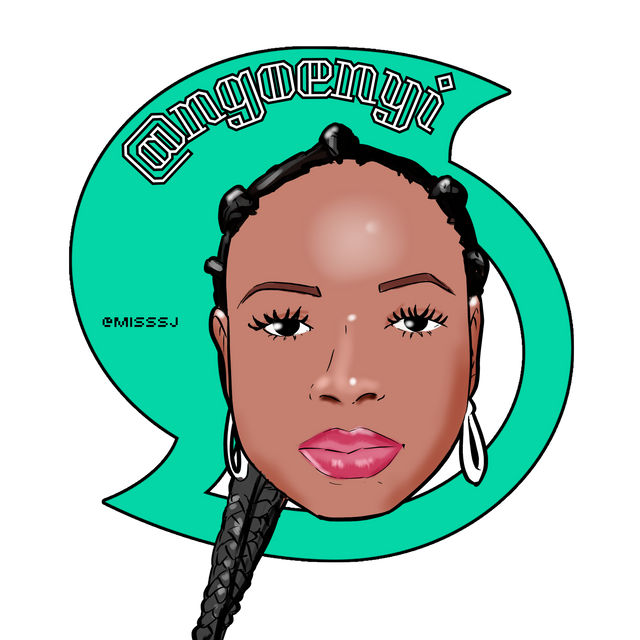
Hey everyone! It's @misssj, a 23-year-old Psychology graduate from the Philippines. Today, I’m thrilled to show you how I create my digital art using my tablet, featuring @ngoenyi. Let's dive into the journey of this fabulous artwork. 🌟

Step 1: Sketching the Outline

I start with a rough sketch, using a light pink brush to outline @ngoenyi's face. It’s all about getting the proportions right – eyes, eyebrows, lips, and ears. The key is to keep it loose and not worry about perfection. Think of it as the foundation for your masterpiece.
Step 2: Refining the Lines

Next, I switch to a darker, more defined brush to refine the initial sketch. Here, I focus on details like the shape of the eyes, fullness of the lips, and the braided hair design. This step is about making the rough lines more polished and precise to make @ngoenyi’s features pop!
Step 3: Adding Base Colors

With sharp lines in place, I lay down the base colors for the skin, hair, and lips. For the skin, I choose a warm brown tone reflecting @ngoenyi’s beautiful complexion, deep black for the hair, and a lovely shade of pink for the lips. This sets the stage for shading and highlights.
Step 4: Shading and Highlights

This is where the magic happens! Shading and highlights add depth and dimension. I use a darker brown to shade areas like under the cheekbones and around the nose, and lighter shades for highlights on the forehead, nose, and cheeks. The hair gets glossy highlights to give it a realistic braided texture.
Step 5: Adding Details and Textures

Details are everything! I focus on the eyes, adding lashes and sparkle to make them lively. The lips get subtle texture to show natural lines. For the hair, I add individual strands and highlights to each braid, making it look more realistic. A touch of shine on the earrings completes the look.
Step 6: Final Touches and Background

Almost done! Final touches include cleaning up any rough edges and ensuring the colors blend seamlessly. I add a simple background to make @ngoenyi stand out. A vibrant teal circle with "@ngoenyi" text gives the artwork a modern, stylish finish, making everything pop.
And there you have it! From a rough sketch to a polished digital portrait, that’s how I bring my digital art to life. I hope you enjoyed this glimpse into my creative process. If you have any questions or want to see more of my work, hit me up on Instagram @misssj. Until next time, keep creating and stay fabulous! 💖🎨
Saludos amiga gracias por compartir tu participación con nosotros. Realmente te quedo genial exitos.
Downvoting a post can decrease pending rewards and make it less visible. Common reasons:
Submit
thank you so much
Downvoting a post can decrease pending rewards and make it less visible. Common reasons:
Submit
Thank you so much for drawing ngoenyi. You are really talented. I am grateful
Downvoting a post can decrease pending rewards and make it less visible. Common reasons:
Submit
you are most welcome sis
Downvoting a post can decrease pending rewards and make it less visible. Common reasons:
Submit
Thank you, friend!


I'm @steem.history, who is steem witness.
Thank you for witnessvoting for me.
please click it!
(Go to https://steemit.com/~witnesses and type fbslo at the bottom of the page)
The weight is reduced because of the lack of Voting Power. If you vote for me as a witness, you can get my little vote.
Downvoting a post can decrease pending rewards and make it less visible. Common reasons:
Submit
You've got a free upvote from witness fuli.
Peace & Love!
Downvoting a post can decrease pending rewards and make it less visible. Common reasons:
Submit
Upvoted. Thank You for sending some of your rewards to @null. It will make Steem stronger.
Downvoting a post can decrease pending rewards and make it less visible. Common reasons:
Submit
Downvoting a post can decrease pending rewards and make it less visible. Common reasons:
Submit
thank you for the curation @ruthjoe
Downvoting a post can decrease pending rewards and make it less visible. Common reasons:
Submit
Wow amiga el dibujo te quedó muy bien parece que le hiciste una fotocopia a @ngoenyi ella ha de estar muy halagada por el dibujo que le realizaste mucha suerte en tu participación
Downvoting a post can decrease pending rewards and make it less visible. Common reasons:
Submit