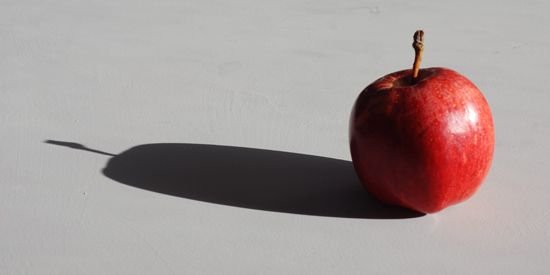
From time to time, I will post some of the posts that I think were awesome before but didn't get any much exposure. Looking back 2 years ago, it's quite hard to believe I've made these paintings on Photoshop using only one brush. (The airbrush tool).
The technique is very amateur, I would say. I was new to painting digitally and I could say there are WAY better techniques than this. Still, I can't deny the fact that I enjoyed making this lol.
Here you go.

Painting digitally is a good way to practice painting since you can experiment with the colors, delete some mistakes, and layer everything with just one click. In this tutorial, I'm going to use Adobe Photoshop CC on my PC. You can also use other software on PC or even on your phone! As long as it has a wide color swatch feature, then you're good to go!
Before we start, allow me to show you my awesome reference photo from Will Kemp. He has tutorials in willkempartschool.com and I suggest you also check that out if you want to learn the traditional way.
Source: http://willkempartschool.com/how-to-shade-a-drawing-light-shadow-part-2/

Drawing Basic Shapes

When I'm drawing something, I always start with drawing basic shapes that will serve as my guide for the whole drawing. It is for me to check if it is placed in the right part of the paper or if the object is proportion to another object.
Contour Line Drawing

I then drew the contour line. Drawing it on another layer will be a lot easier so we can draw underneath it.
Distinguishing the Light and Dark

I added the necessary colors for the apple and shadow. If you're painting something, you should always check the light source for you to know where the highlight and shadow go. For this one, the light source is on the right side, so the shadow should be at the left side.
Adding More Colors

I added more colors while still being mindful of the tones. I used the Opacity and Flow to control and blend the colors. You can also use the smudge tool, it just depends on you!
Hiding the Contour Line Layer

This is how it looks like underneath the Contour Line Layer.
Cleaning the Outlines

Then I painted on the outlines to improve the shape.
Adding More Colors

I added more colors and corrected the parts that needs to be corrected.
Adding the Final Colors

I added more colors until it looks like this. I also added the necessary details and improved the highlight and shadows.
Final Look

This is the final look. I hope you like it!
God damn girl! That detailing is mind-blowing. <3
Downvoting a post can decrease pending rewards and make it less visible. Common reasons:
Submit
Thank you! I'm also quite surprised that I did this lol (I usually don't have patience with detailing cos I get lazy)
Downvoting a post can decrease pending rewards and make it less visible. Common reasons:
Submit
Yeah, Detailing can definitely be a legit pain in the ass! :D
Downvoting a post can decrease pending rewards and make it less visible. Common reasons:
Submit
Digital art is so different. If only I could hid the contour lines in real life haha.
Downvoting a post can decrease pending rewards and make it less visible. Common reasons:
Submit
Yeah it's way easier in digital. Only thing you can do with traditional art is to make an illusion to "hide" the contour lines haha
Downvoting a post can decrease pending rewards and make it less visible. Common reasons:
Submit
Wow... this is incredible work.
Downvoting a post can decrease pending rewards and make it less visible. Common reasons:
Submit
waw, you are a great artist :)
Downvoting a post can decrease pending rewards and make it less visible. Common reasons:
Submit
This post earned a total payout of 69.044$ and 34.522$ worth of author reward that was liquified using @likwid.
Learn more.
Downvoting a post can decrease pending rewards and make it less visible. Common reasons:
Submit