Como Descargar y Editar tus Fotos en PhotoScape #1. Primeros Pasos - How to Download and Edit your Photos in PhotoScape. First Steps #1

in hive-185836 •  4 years ago 


COMO EDITAR FOTOS EN PHOTO SCAPE FOTO PRINCIPAL.jpg

Saludos a toda la comunidad #worldofxpilar, el propósito principal de esta publicación es colaborar con nuevos usuarios, para mejorar la presentación de sus fotos, los cuales, muchas veces desconocen, que existen algunos Editores de Fotos fáciles, a los que pueden acceder y que les permitirá mejorar la calidad de las fotografías utilizadas en sus publicaciones. Sé que hay una amplia variedad de editores de fotos más sofisticados, también quiero enfatizar que no soy un fotógrafo profesional, ni tengo un contrato con PhotoScape, pero creo que la edición en PhotoScape es una de las formas más fáciles de editar fotos y que tiene una gran cantidad de herramientas que cualquiera puede usar, porque son muy sencillas, pero eso sí, hay que aprenderlas y practicarlas, poco a poco, para familiarizarte con esta valiosa herramienta de edición, que además es gratuita. , y eso ayudará a los nuevos usuarios a hacer una presentación mucho más bonita y llamativa. Por ahora, solo describiré los primeros tres pasos básicos para editar. Espero que sea de gran ayuda para los nuevos usuarios y también para los no tan nuevos.

Greetings to the entire #worldofxpilar community, the main purpose of this publication is to collaborate with new users, to improve the presentation of their photos, which, many times are unaware, that there are some easy Photo Editors, which they can access and that Allow them to improve the quality of the photographs used in their publications. I know there are a wide variety of more sophisticated photo editors, I also want to emphasize that I am not a professional photographer, nor do I have a contract with PhotoScape, but I find editing in PhotoScape to be one of the easiest ways to edit. photos and that it has a lot of tools that anyone can use, because they are very simple, but yes, you have to learn and practice them, little by little, to become familiar with this valuable editing tool, which is also free. , and that will help new users to make a much more beautiful and eye-catching presentation. For now, I'll just describe the first three basic steps for editing. Hope it is of great help for new users and all not so new ones too.


image.png


Primeros Pasos para Descargar y Editar en PhotScape
First Steps to Download and Edit in PhotScape


Paso 1- Step 1


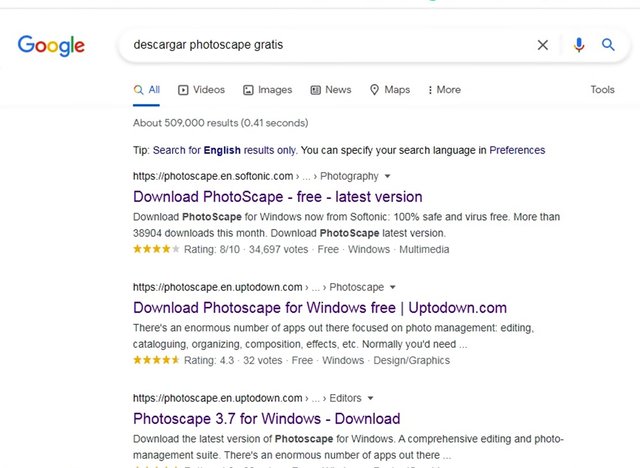
Lo primero que tendrás que hacer, descargar en Google, la aplicación de PhotoScape. Escribiendo en el buscador "Descargar PhotoScape Gratis", como aparece en la imagen de abajo.

The first thing you will have to do, download the PhotoScape application from Google. Typing in the search engine "Download PhotoScape Free", as it appears in the image below.

COMO EDITAR FOTOS EN PHOTO SCAPE 1.jpg


Paso 2- Step 2


Puedes hacer click en el Link #1 o en el #2, como prefieras, yo elegí el #2, pero debes asegurarte que diga free, como te señala el circulo de la imagen. Si puedes, te recomiendo escoger la versión en español, si eres de habla hispana, se te hará mas sencillo, de lo contrario es indiferente.

You can click on Link # 1 or # 2, as you prefer, I chose # 2, but you must make sure it says free , as indicated by the circle in the image. If you can, I recommend you choose the Spanish version, if you are Spanish-speaking, it will be easier for you, otherwise is indifferent.


COMO EDITAR FOTOS EN PHOTO SCAPE 1.jpg


Paso 3- Step 3


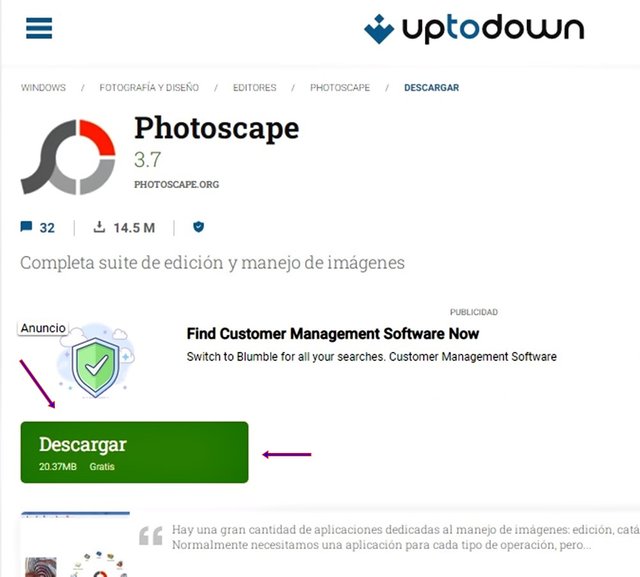
Después de haber hecho Click en el link seleccionado, te aparecera este cuadro donde deberás darle al recuadro verde que dice Descargar.

After clicking on the selected link, this box will appear where you must click on the green box that says Download .

COMO EDITAR FOTOS EN PHOTO SCAPE 3 .jpg


Paso 4- Step 4


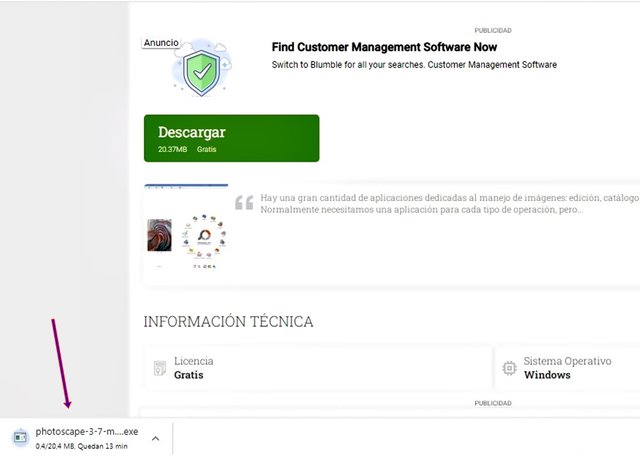
Te darás cuenta de que el programa se esta descargando, porque te aparecerá un recuadro en la parte baja izquierda, como señala la flecha en la imagen, que te dice el tiempo faltante para concretar la descarga. Deberás esperar unos minutos...

You will realize that the program is downloading, because a box will appear in the lower left, as indicated by the arrow in the image, which tells you the time remaining to complete the download. You will have to wait a few minutes ...

COMO EDITAR FOTOS EN PHOTO SCAPE 4 .jpg


Paso 5- Step 5


Cuando veas que ya se ha descargado el programa, debes ir a Descargas en tu computadora, y abres dicho programa, o buscas en el escritorio a ver si te aparece el logo de PhotoScape y lo abrirás haciendo click sobre el Logo, igual al de la imagen.

When you see that the program has already been downloaded, you must go to Downloads on your computer, and open said program, or look on the desktop to see if the PhotoScape logo appears and you will open it by clicking on the Logo, equal as the one on the picture.

Logo de photscape.jpg


Paso 6- Step 6


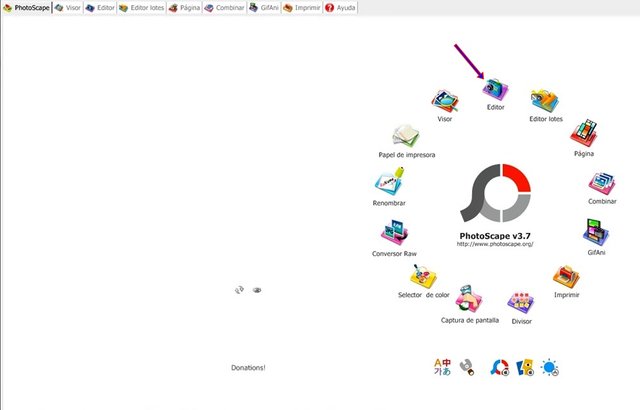
Al hacer click en el Logo, te apareceá la página inicial de Photo Scape. Para abrir las funciones le darás click en Editar, donde te indica la flecha.

When you click on the Logo, the Photo Scape home page will appear. To open the functions you will click on Edit , where the arrow indicates.

COMO EDITAR FOTOS EN PHOTO SCAPE 6 .jpg


Paso 7- Step 7


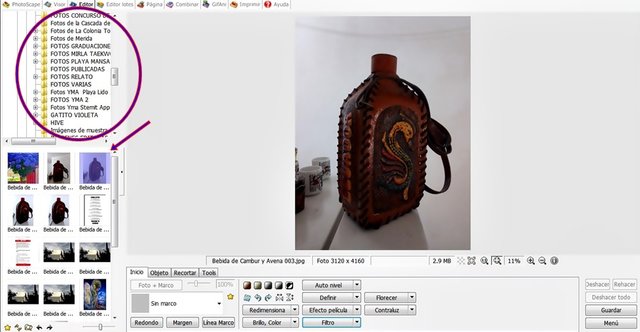
Inmediatamente se abrira, el Editor, que te mostrará del lado izquierdo como se señala, la lista de fotos que tengas que has guardado en tus Imágenes. Paso seguido abres la carpeta de tu preferencia y escoges la foto que vas a editar y te aparecerá automáticamente en la pantalla del editor.

The Editor will open immediately, and will show you on the left side as indicated, the list of photos that you have saved in your Images. Next, you open the folder of your choice and choose the photo that you are going to edit and it will automatically appear on the editor screen.

COMO EDITAR FOTOS EN PHOTO SCAPE 7.jpg


Paso 8 - Step 8


Lo primero que vamos a aprender es aQuitarle el Ruidoa tu foto. El Ruido son esas zonas de la foto que se ven como granuladas y que desvirtúan la imagen tal como la viste con tus propios ojos,cuando tomaste la foto. Lo primero que vas a hacer es buscar la palabra Filtrohaces click y se desplegará una lista de funciones. Al final de la lista encontrarás la función Reducción Ruido (Limpia Piel) , haces clic allí y se desplegará otra pestañita con tres opciones: Bajo , Medio, Alto.Esto te indicará el nivel de ruido que vas a quitar. Personalmente te sugiero que apliques, Bajo o Medio, en muy pocas ocasiones es necesario darle en Alto, pero todo dependerá de tu preferencia. En todo caso, "siempre podrás deshacer la acción si el resultado no te gusta", presionando en deshacer del lado derecho abajo y corregir.

The first thing we are going to learn is to Remove the Noise from your photo. Noise are those areas of the photo that look grainy and distort the image as you saw it with your own eyes, when you took the photo. The first thing you are going to do is search for the word Filter , click and a list of functions will be displayed. At the end of the list you will find the Noise Reduction (Skin Cleaner) function, click there and another tab will appear with three options: Low, Medium, High. This will tell you the noise level you are going to remove. Personally, I suggest you apply Low or Medium, in very few occasions it is necessary to give it High, but everything will depend on your preference. In any case, "you can always undo the action if you don't like the result" , by clicking on undo on the bottom right and correct.


COMO EDITAR FOTOS EN PHOTO SCAPE 7.jpg


Paso 9 - Step 9


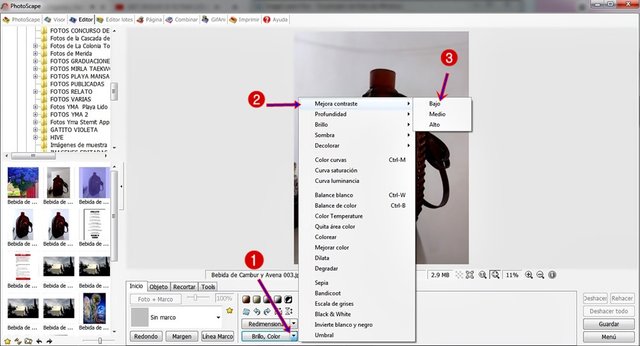
Seguidamente, procederemos a mejorar el Contraste de la Imagen que estamos editando. Para hacer eso presionarás en la pestañita al lado de donde dice Brillo, Color". Se desplegara una lista de las acciones disponibles. Presionaras arriba donde dice "Mejora Contraste" y se desplegará una pequeña pestaña que dice, Bajo, Medio, Alto. Escogerás la de tu preferencia pero hago la misma sugerencia del paso anterior.

Next, we will proceed to improve the Contrast of the Image that we are editing. To do this you will click on the tab next to where it says Brightness, Color ". A list of available actions will be displayed. You will click above where it says " Contrast Improvement " and It will display a small tab that says, Low, Medium, High . You will choose the one of your preference but I make the same suggestion as the previous step.

COMO EDITAR FOTOS EN PHOTO SCAPE 9.jpg


Paso 10 - Step 10


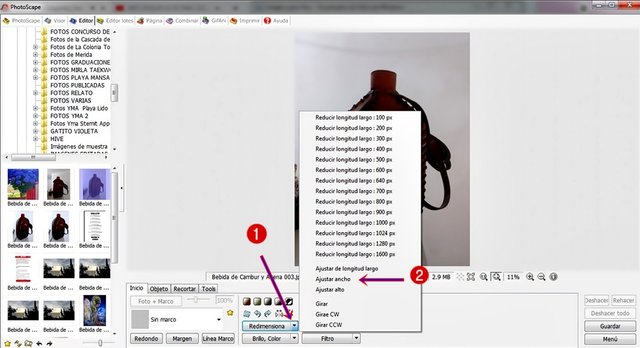
Por último y por ahora, procederemos a Redimensionar el tamaño de la imagen. Buscarás la palabra Redimensionar y haras click en la pestaña de la derecha, tal como se indica. Te aparecerá una lista de opciones. Te sugiero tomar la opción, "Ajustar Ancho".

Finally and for now, we will proceed to Resize the image size. You will look for the word Resize and click on the tab on the right, as indicated. A list of options will appear. I suggest you take the option, "Fit Width" .

COMO EDITAR FOTOS EN PHOTO SCAPE 8.jpg


Paso 11 - Step 11


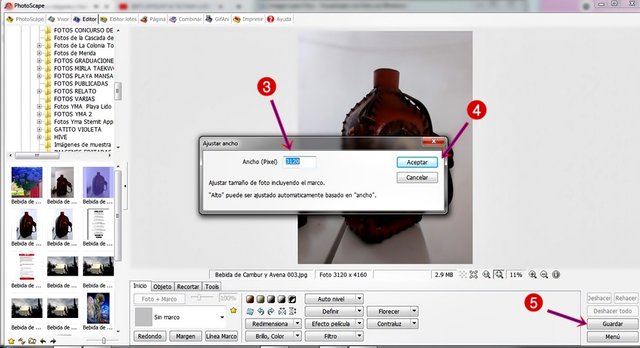
Seguidamente te aparecerá un recuadro como el de abajo con la medida original de la imagen. Debes hacer click donde esta la medida para que se remarque. Así mismo escribirás en numero manualmente, el tamaño que prefieras. Yo te sugiero cualquiera de estas opciones: 600 (pequeño), 1000 (mediano), 2000 (grande). Mientras mas pequeña la cantidad, mas pequeña te aparecerá la foto en tu post. Las cantidades que te dí son opcionales. En todo caso, siempre podrás, rehacer todo lo que hayas hecho pero que no te guste, como te indique en el paso nro. 8.

Then a box like the one below will appear with the original size of the image. You must click where the measure is to be highlighted. Also you will write the number manually, the size you prefer. I suggest any of these options: 600 (small), 1000 (medium), 2000 (large). The smaller the amount, the smaller the photo will appear in your post. The amounts I gave you are optional. In any case, you can always redo everything you have done, but do not like, as indicated in step no. 8.

COMO EDITAR FOTOS EN PHOTO SCAPE 10.jpg


Paso 12 - Step 12


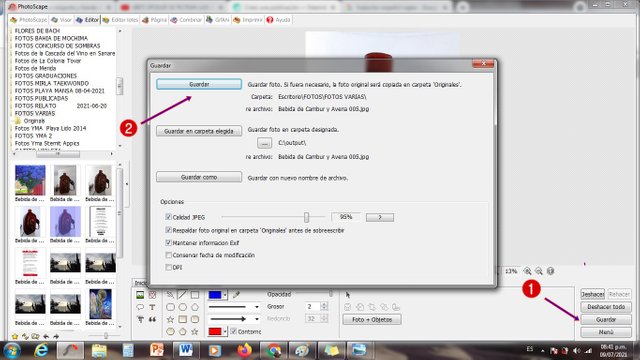
Por ultimo y Bien Importante y que NO, debes olvidar, es guardar todos los cambios que hayas hecho en la imagen que has editado pues sino, la foto no te aparecerá editada. Para eso debes hacer click en la palabra Guardar, lado derecho abajo y te aparecerá un recuadro como el que aparece en la imagen al que tienes que volver a presionar en guardar, ¡¡Y Listo!! . Ya podrás cerrar PhotoScape y dirigirte a tus Imágenes donde te aparecerá, automáticamente, tu foto ya Editada.

Finally and Very Important You must Not forget , You have to save all the changes that you have made in the image that you have edited otherwise, the photo will not appear edited. To do this, click on the word Save , on the bottom right side and a box like the one that appears in the image will appear, to which you must press save again, and that's it !! . Now you will be able to close PhotoScape and go to your Images where your already Edited photo will appear automatically.

COMO EDITAR FOTOS EN PHOTO SCAPE 11.jpg


Paso 13 - Step 13


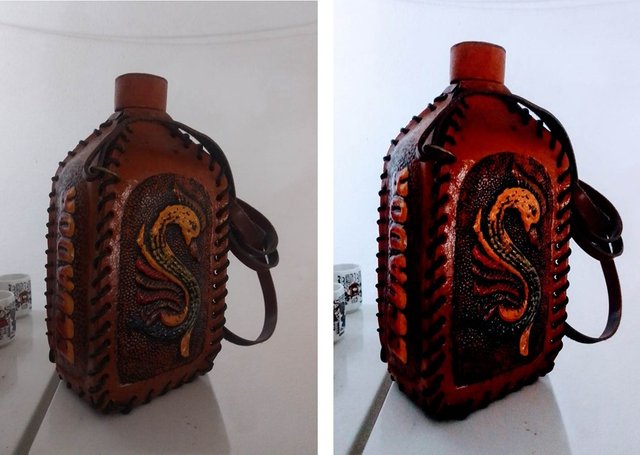
Aquí te muestro el Antes y el Después de la Edición, para que puedas notar la diferencia entre una foto editada y otra no editada. Recomendación Importante: Hay veces en que si participas en una actividad especial de steemit, algo así como un concurso, es probable que te pidan, no editar las fotos y debes cumplir con ello. Pero de otro modo, te recomiendo siempre hacer una edición sencilla a tus fotos, para que se vean mas bonitas y atractivas.

Here I show you the Before and After of the Editing, so that you can tell the difference between an edited photo and an unedited one. Important Recommendation: There are times when if you participate in a special steemit activity, something like a contest, it is likely that you will be asked not to edit the photos and you must comply with it. But otherwise, I always recommend doing a simple edit to your photos, so that they look more beautiful and attractive.

ANTES -BEFORE
DESPUÉS-AFTER

COMO EDITAR EN PHOTOSCAPE ULTIMA FOTO.jpg


image.png


Bueno amigos, espero que les haya gustado mi post y que haya sido lo suficientemente explícita, para que puedan entenderlo fácilmente. Este post es mi aporte para la comunidad de #worldofxpilar, y para la comunidad de Nuevos Usuarios de Steemit. Si desean, que profundice, en algo mas, referente a la Edición en PhotoScape, solo háganmelo saber, en la casilla de Comentarios, yo tomaré con mucho gusto sus sugerencias. Hasta pronto.

Well friends, I hope you liked my post and that it was explicit enough, so that you can easily understand it. This post is my contribution to the #worldofxpilar community, and to the community of New Steemit Users. If you want me to delve into something more, regarding Editing in PhotoScape, just let me know, in the Comments box, I will gladly take your suggestions. See you soon.

IMAGEN SELLO STEEMIT YMA.jpg

Imagen para Steemit.jpg

Authors get paid when people like you upvote their post.
If you enjoyed what you read here, create your account today and start earning FREE STEEM!
Sort Order:  

Your post is manually rewarded by the
World of Xpilar Community Curation Trail

Join the World of Xpilar Curation Trail

Muchas Gracias @xpilar por tomar en cuenta mi publicación, lo aprecio mucho.

image.png

Thank you very much @xpilar for taking my post into account, I appreciate it very much.