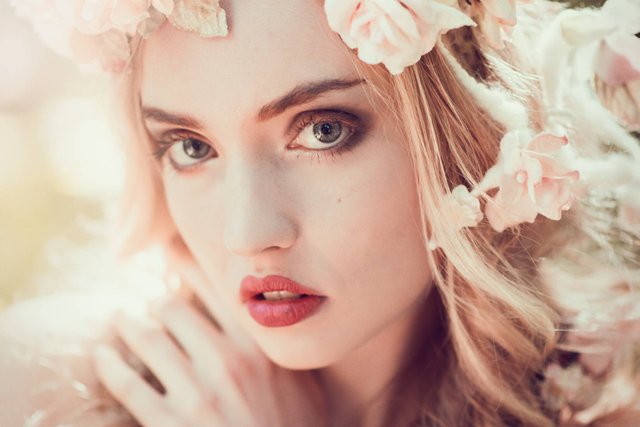
Introduction
Recently I have been looking through some of my old photos to find something new to sketch or paint.
Whilst doing so it reminded me of the importance of how much of a difference colour makes to the mood of a photograph.
This is not difficult to achieve in Photoshop although it does take time -since it often requires some experimentation and tweaking - but I think it is worth it.
Using Photoshop we can replicate the effects of certain old film types and light combinations.
Obviously you need to start with a good image in the first place. I have included the image details at the bottom.
The Photos
1 - The Original Photo
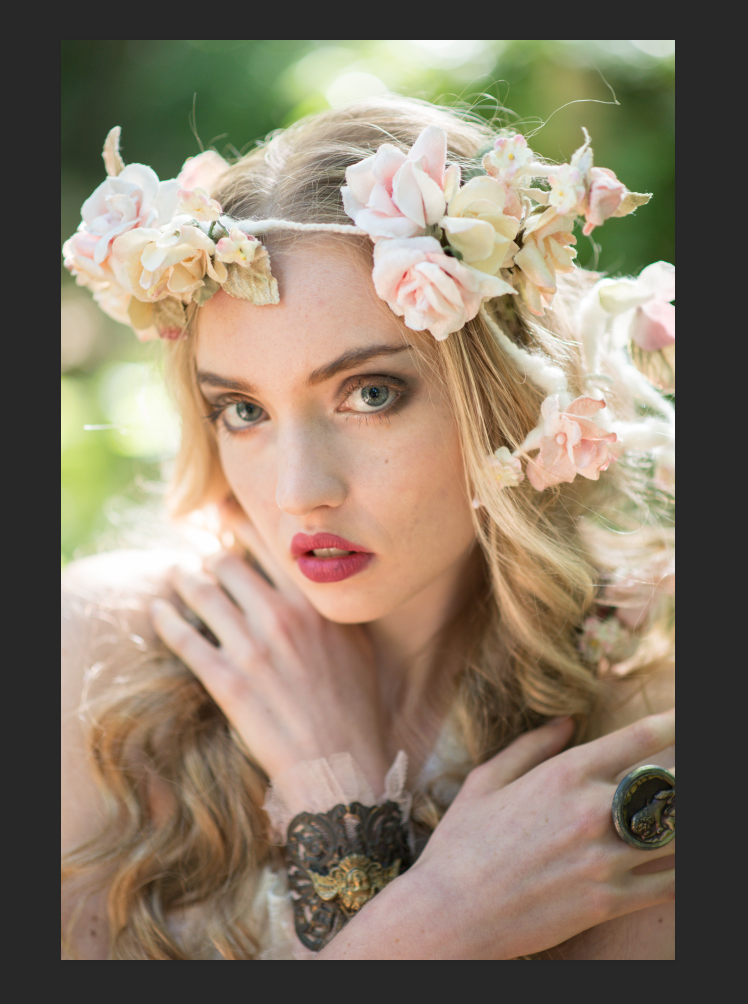
This actually looks pretty good already but it lacks some warmth.
2 - Highpass Filter
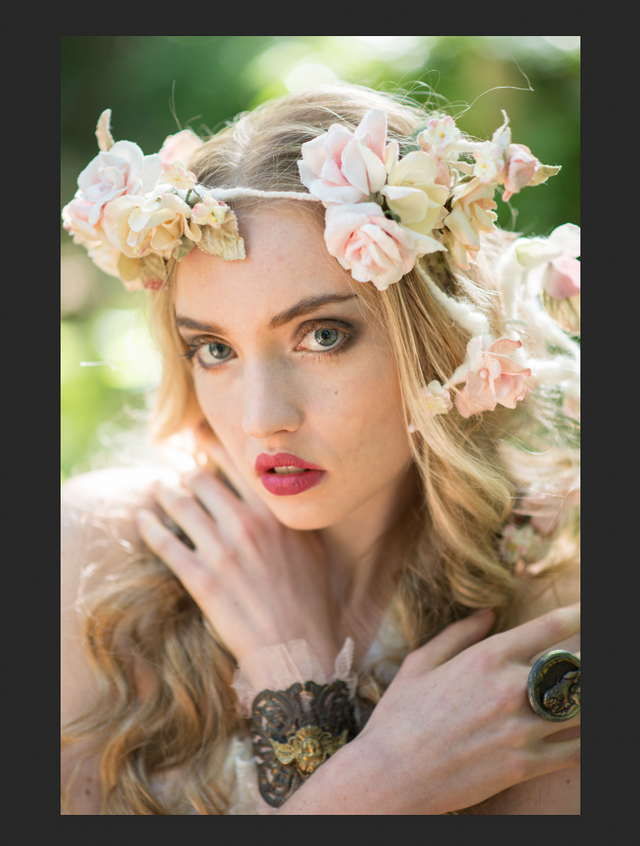
The high-pass filter allows you to sharpen the eyes and face a little to draw more attention to it. This can be helpful particularly when you shoot with very wide apertures but should not be overdone.
3 - Mild Vignette
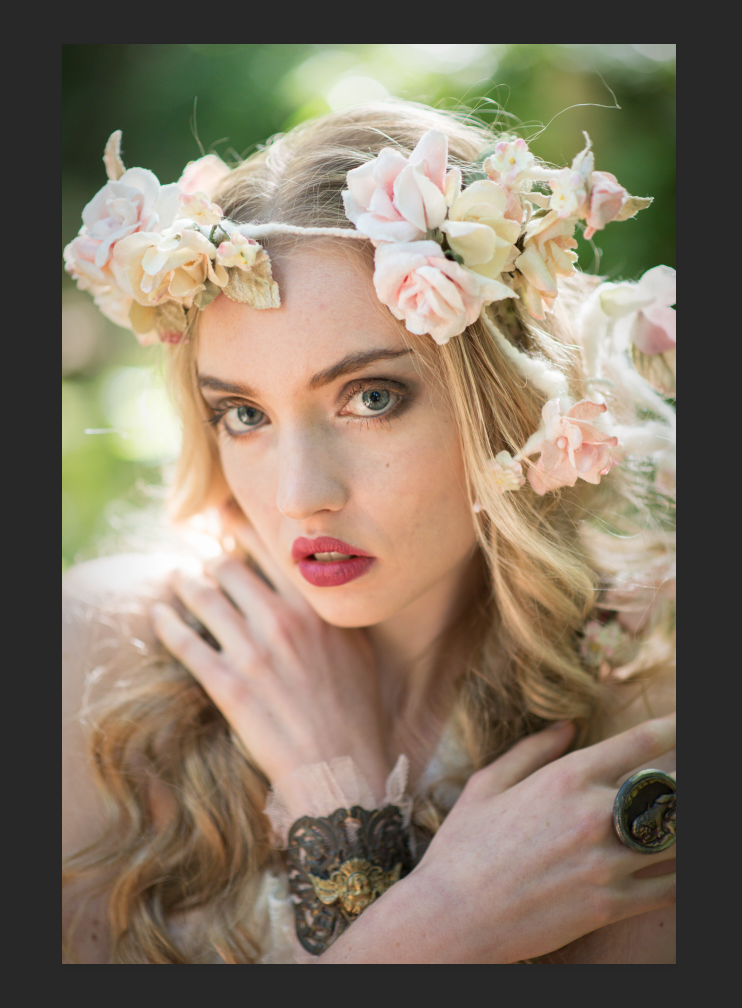
You can do this a number of ways but one way is to make a new layer with reduced exposure and use a mask to shape it the way you want.
4 - A Black and White Layer at 25% to increase contrast
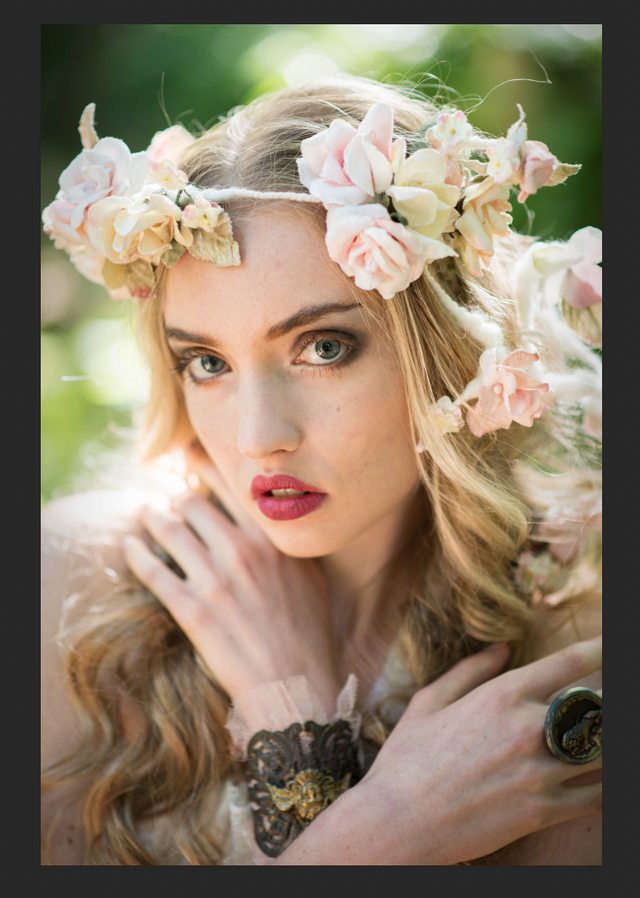
This is one of my favourite techniques for tweaking contrast, by adjusting the colour balance in the black and white layer it allows more fine control than regular contrast adjustment.
5 - A Tweak to Saturation and Vibrance
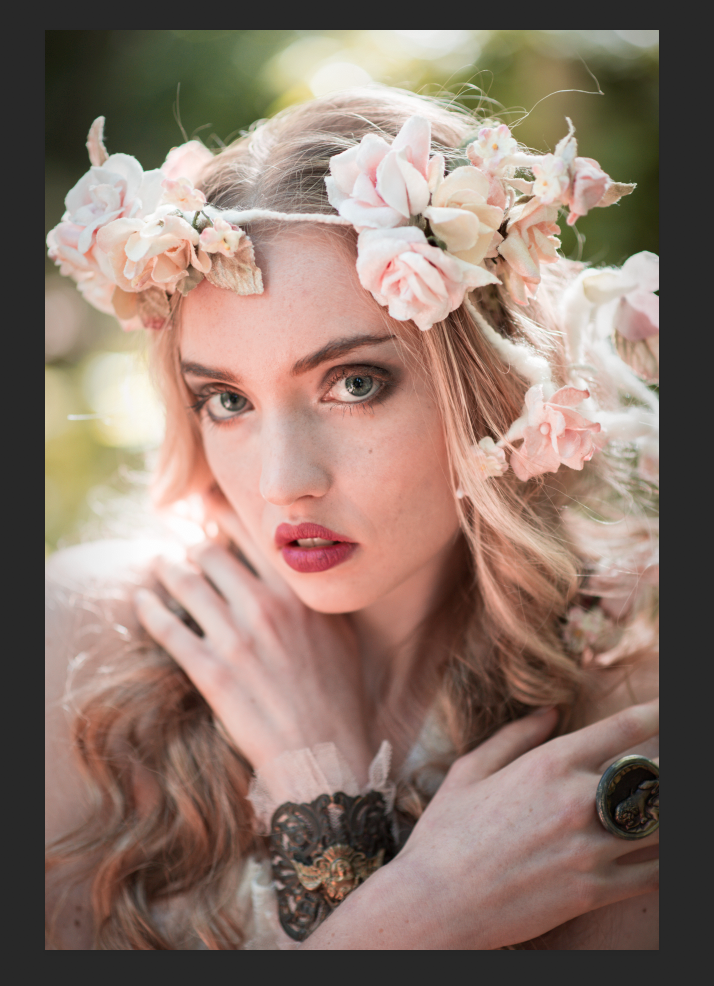
Just increasing the warmth.
6 - Selective Colour Adjustment Layer

I wanted to further tweak the colours.
7 - Curves adjustment
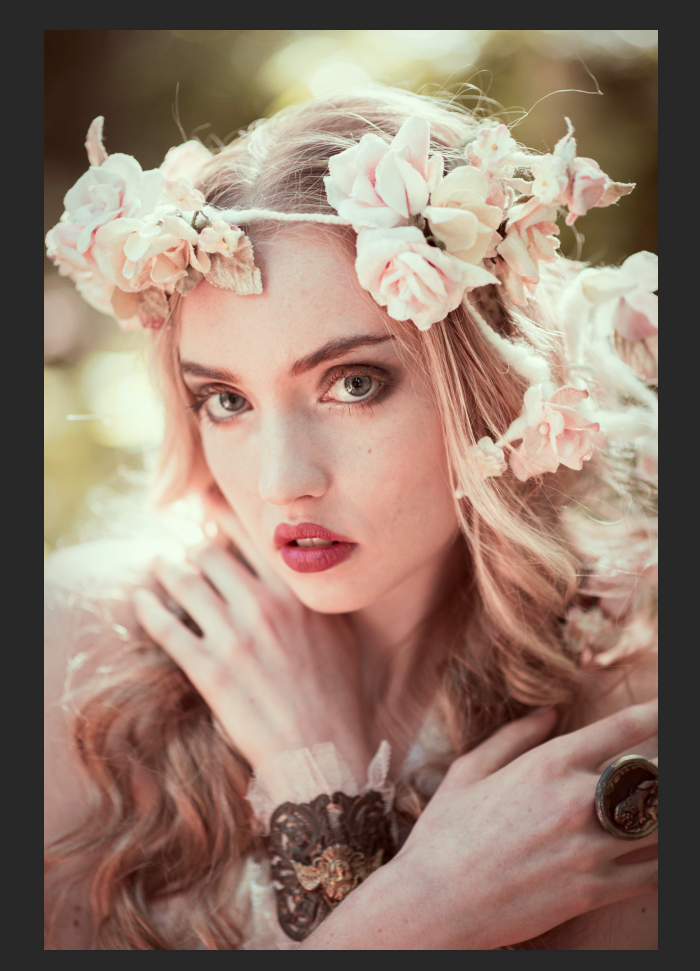
This also helps to reduce some of the excess red and boost some of the greens.
8 - Adjustment to Vibrance and Saturation

Further colour tweaking.
9 - Use of a Gradient to Create an Area Light
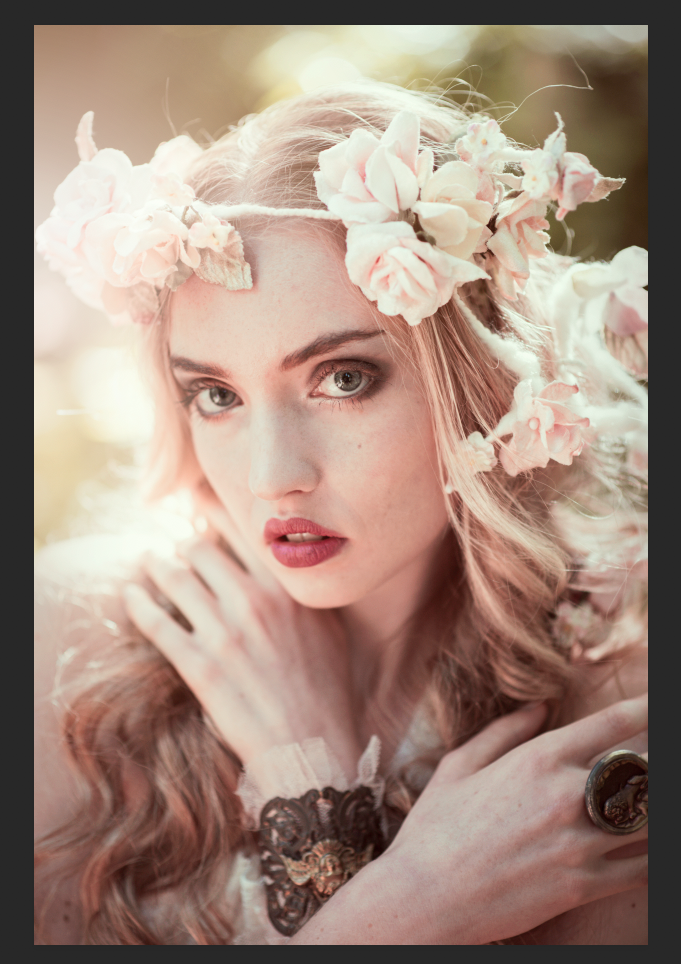
This is something I specifically learned from Emily. Previously I had used plugins for this sort of thing (like Color Efex Pro). Gradients give a lot more control by combining the gradient with masks and other layer types.
10 - Final Skin and Hair Fixes
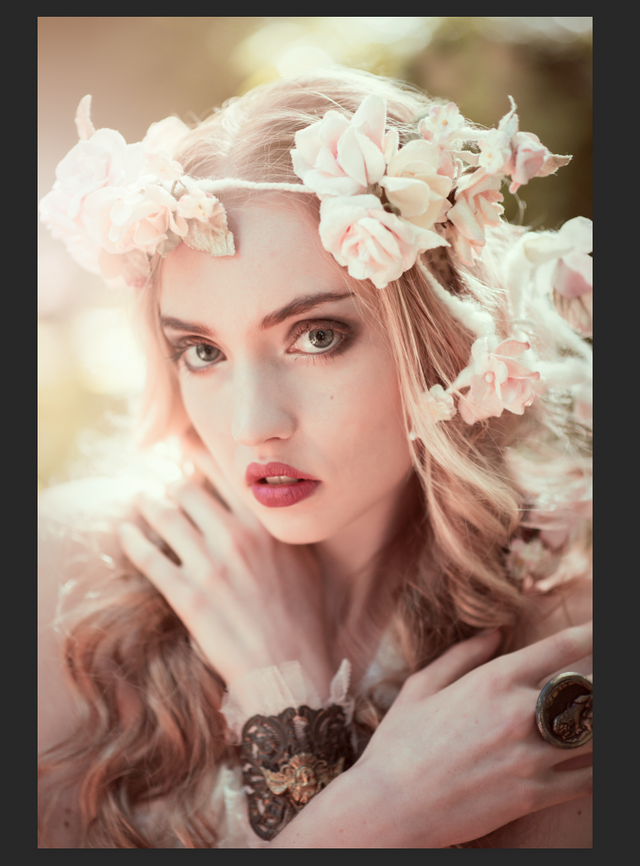
The changes have made some skin and hair issues more prominent so I did some minor retouching.
11 - Final Colour Adjustment
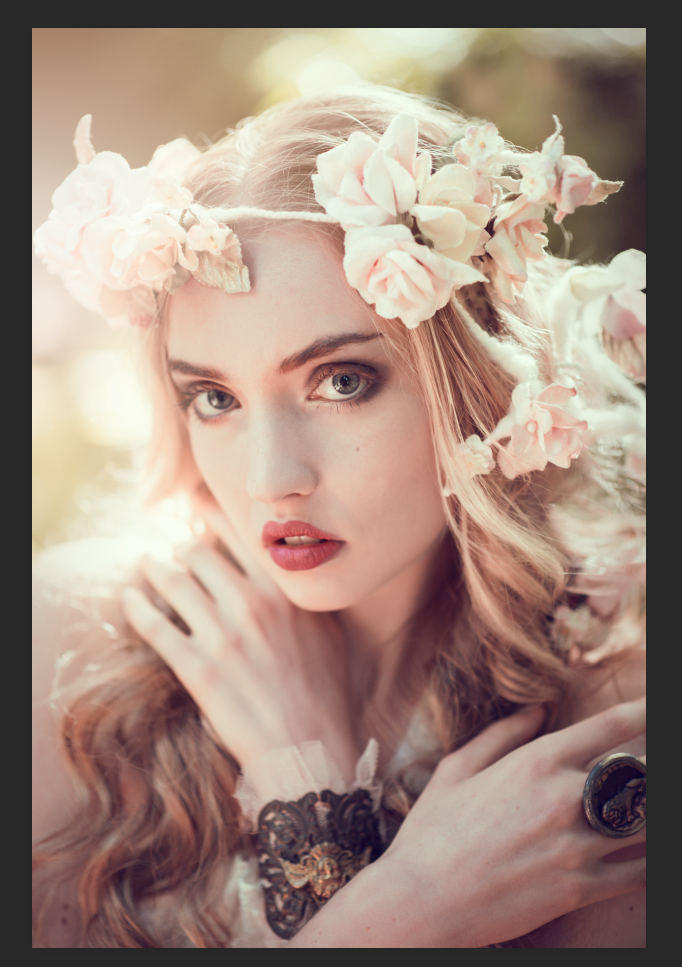
Colour still felt like it needed tweaking so I readjusted it.
12 - Final Curves Adjustment
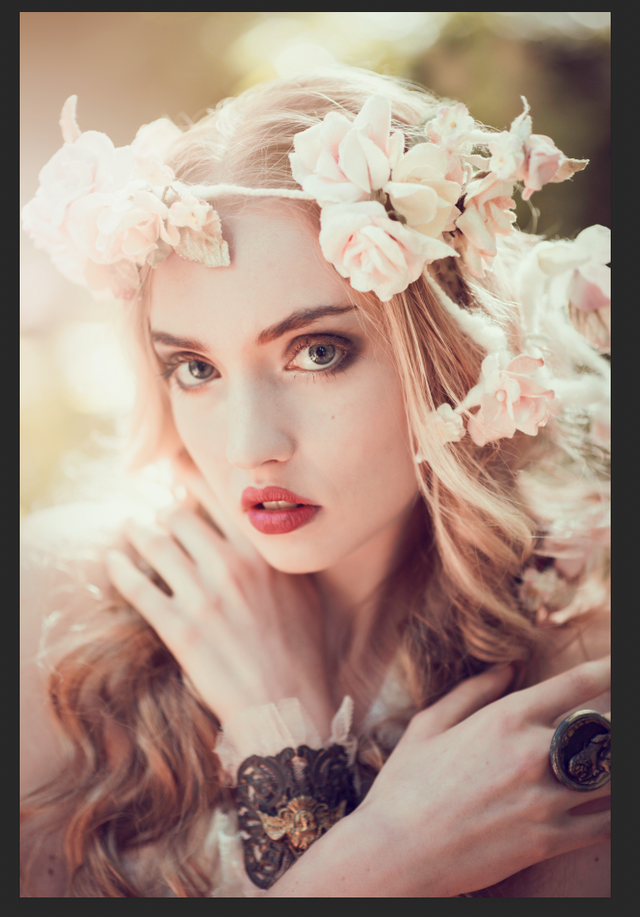
I couldn't resist some further tweaking to adjust contrast and colour using a curves layer. I have a tendency to tweak a lot!
13 - Add Grain
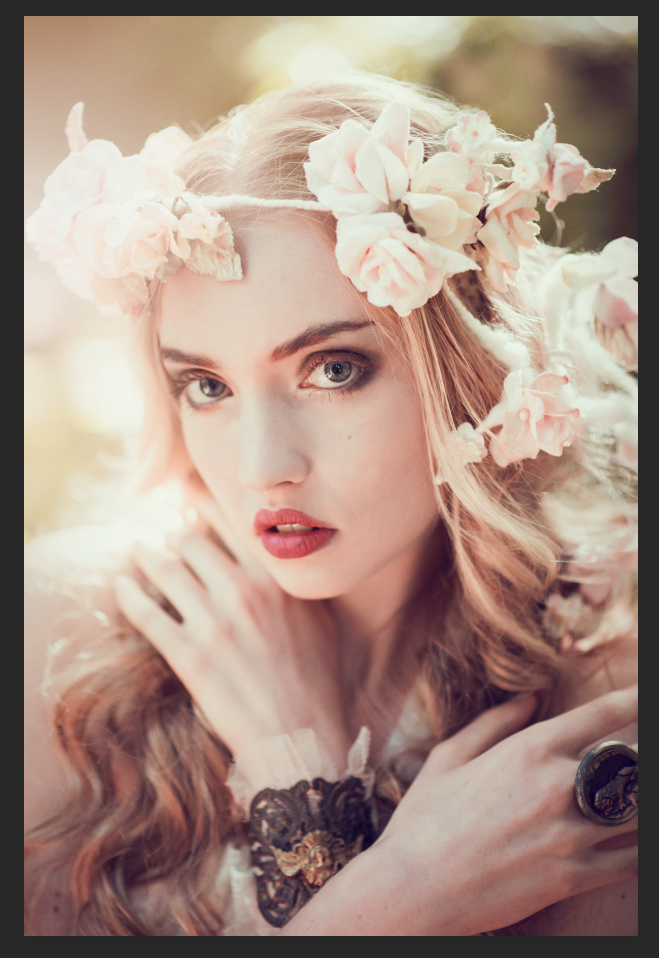
Another thing that I do quite a lot is add some film type grain to replicate that old school look. This is achieved using the PS noise filter.
14 - Final Image Uncropped
-2.jpg)
15 - Final Image Cropped
.jpg)
I generally prefer landscape orientation and also it works better for blog posts. Let me know if you prefer the portrait or landscape version. Because of the high megapixel count of modern cameras it gives a lot of leeway for this.
Photo Details
These images were taken during a 2013 workshop with one of my favourite photographers Emily Soto.
One of the things I learnt there was that having professional hair and makeup makes a huge difference to how much retouching you need to do.
So do professional wardrobe and accessories.
It also greatly speeds up the shooting process if you can have assistants to direct.
Emily let us use her team and equipment ourselves so that we could direct the lighting, reflectors etc without having to continually stop shooting and change our positions.
The end result is that a group of shots that might normally take an hour when you are alone can get done in about 5 minutes!
Unfortunately it is too expensive for most of us amateur photographers to afford such luxuries, but one way of getting around it is to attend workshops and group shoots where the costs can be divided amongst a group of photographers.
Plus you learn new techniques too!
One of the things that Emily really taught me was to be more creative in my colour editing to help create the mood of the photo.
Emily sells her own Photoshop actions called "Fashion Actions" (which you can get for free if you attend her workshops) but are also available on her website.
The great thing about them is that unlike a plugin, these actually take you through the steps to alter the colours etc in Photoshop (rather than just clicking a button), so it guides you through the process of making the changes yourself.
As a result you learn how to use these techniques yourself and can create your own actions (an action is basically a macro for PS).
You could just learn by sifting through online PS tutorials but had I known about these actions earlier I would have spent some money and saved myself a lot of time.
Details/Camera Info
- Nikon D800.
- Nikon 85mm/1.8 lens.
- Natural Light, reflectors, beauty dish.
- Edited in Photoshop.
- Model Nancy Morris.
- Clothing by Fiori Couture.
- Hair/makeup by Monic Swiatek.
- Emily Soto Workshops.
- Photography and direction - me!

Computers (and later, digital photography) has changed photography in ways that three decades ago you couldn't imagine.
Back then, you would have two camera bodies (at least) one with kodachrome and one with Pan-x. You had a dozen filters to fit on the ends of the lens, and probably a dozen lenses. Because, what you captured at the moment is what you got in the photograph.
Hundreds of feet of film were shot for a few photographs.
And you shot them all because you never knew what you had in the can until developing.
Of course, there was the fun you could have in the darkroom.
Their magic could be done, by hand, in real time.
With digital, getting the moment is the most important thing. Much of everything else can be done in post production.
Downvoting a post can decrease pending rewards and make it less visible. Common reasons:
Submit
Yes and in those old days if you wanted to do work in the lab you had to be an amazing artist - I hadn't realised that some of the legendary photographers like Ansel Adams used to do quite a lot of dark room editing! Photoshop speeds up a lot of those techniques and gives you completely new options too.
Downvoting a post can decrease pending rewards and make it less visible. Common reasons:
Submit
Im absolute trash when it comes to taking photos...
i feel like i should take the time to learn how to photoshop, at least the basics, there are so many things that can be done on the program
Downvoting a post can decrease pending rewards and make it less visible. Common reasons:
Submit
Yes but you need a good photo in the first place otherwise there is no point.
Downvoting a post can decrease pending rewards and make it less visible. Common reasons:
Submit
That is just so true. Reading through your post with all the steps that was exactly what was going through my mind the whole time, you gotta start with a great photo to begin with!
Great post, btw!
Downvoting a post can decrease pending rewards and make it less visible. Common reasons:
Submit
Thank you!
Downvoting a post can decrease pending rewards and make it less visible. Common reasons:
Submit
Great post! :) I love to play with photos in Photoshop to see how I can make the best out of them.
Downvoting a post can decrease pending rewards and make it less visible. Common reasons:
Submit
Cool:) I think it is fun to just experiment with it because there is so much you can do.
Downvoting a post can decrease pending rewards and make it less visible. Common reasons:
Submit
this is a very detailed step by step procedural post outlining how to achieve spectacular photographic effects. For a layman like me, it was quite enlightening and allowed me to see all the different decisions that go into making a beautiful photo. I can now appreciate the art that underlies this process.
BTW, to my uneducated eye, the landscape orientation seems to work best and I agree it would be preferable to use in blog posts.
A very informative and fascinating post!
Downvoting a post can decrease pending rewards and make it less visible. Common reasons:
Submit
Thank you!
Downvoting a post can decrease pending rewards and make it less visible. Common reasons:
Submit
Beautiful work. Part of my job requires me to take photos with products that have mirror surfaces. Super difficult to get the adjustments correct so the picture looks great on the internet. Thanks for this post @cryptofiend --there are several tips here that I can tell are going to help me with my job. Especially step #9 using a gradient and step #13 using grain in the photo.
Downvoting a post can decrease pending rewards and make it less visible. Common reasons:
Submit
You're welcome I'm glad you found it useful. You could try using a polarising filter for reflective surfaces.
Downvoting a post can decrease pending rewards and make it less visible. Common reasons:
Submit
I'm going to try that, never have before but I'm excited to see how it shows the product. Thanks for the tip.
Downvoting a post can decrease pending rewards and make it less visible. Common reasons:
Submit
You should it might not always work but it could help in some cases.
Downvoting a post can decrease pending rewards and make it less visible. Common reasons:
Submit
looks very nice! one day i might try to do something like that :)

Downvoting a post can decrease pending rewards and make it less visible. Common reasons:
Submit
You should:)
Downvoting a post can decrease pending rewards and make it less visible. Common reasons:
Submit
^_^
Downvoting a post can decrease pending rewards and make it less visible. Common reasons:
Submit
Wow great overview...very cool
Downvoting a post can decrease pending rewards and make it less visible. Common reasons:
Submit
Thanks glad you like it:)
Downvoting a post can decrease pending rewards and make it less visible. Common reasons:
Submit
Upvoted and Resteemed by xx-votesplus, the dropAhead curation team! Want more earnings? Join @dropahead in Streemian https://streemian.com/profile/curationtrail/trailing/396, or delegate/donate some STEEM POWER to @dropahead!
Please upvote this comment! We will earn more STEEM POWER (SP) to give you more earnings!
Keep up the good work!
Most recent post: First 7 weeks of xx-votesplus: YOUR dropAhead Curation Team!
Downvoting a post can decrease pending rewards and make it less visible. Common reasons:
Submit
I have done a little work with RawTherapee becasue I like to shoot in raw format and then have the computer process some of the nicer ones, but Im too cheap to pay for PhotoShop :)
My problem is a basic lack of artistic talent...
Downvoting a post can decrease pending rewards and make it less visible. Common reasons:
Submit
So is RawTherapee an app? I haven't heard of it before.
Downvoting a post can decrease pending rewards and make it less visible. Common reasons:
Submit
Yeah, free to download from http://rawtherapee.com/
Downvoting a post can decrease pending rewards and make it less visible. Common reasons:
Submit
Thank you for this wonderful workflow review and a beautiful photo. I always do sharping last, I is sorta my finishing move, so much so that when I was first reading, some part of my brain was screaming "😲 No, NO that goes last!" LOL our habits can be funny sometimes.
Also a really good tip on paying for hair and makeup, it really does move the photo along towards the final point long before you even get it into PhotoShop.
Cheers,
@kellyjanderson
Downvoting a post can decrease pending rewards and make it less visible. Common reasons:
Submit
Yes normally you should but this was selective sharpening on the eyes not overall sharpening.
Downvoting a post can decrease pending rewards and make it less visible. Common reasons:
Submit
It can do wonders for those who know how to use it , I wish to take a class on photoshop and adobe , maybe then my pictures will come out 100 times better , plus it's a very good skill to have for the job field as well
Downvoting a post can decrease pending rewards and make it less visible. Common reasons:
Submit
It can make a good photo better but it can't make up a bad one look good.
Downvoting a post can decrease pending rewards and make it less visible. Common reasons:
Submit
Of course , just make a decent photo better and so on . Thanks for sharing this with us 👌🏽
Downvoting a post can decrease pending rewards and make it less visible. Common reasons:
Submit
You're welcome!
Downvoting a post can decrease pending rewards and make it less visible. Common reasons:
Submit
Nice tips, and I'm always interested in seeing before and after photos. I suck at using Photoshop and I definitely need to try some of these techniques. Great post! :)
Downvoting a post can decrease pending rewards and make it less visible. Common reasons:
Submit
You're welcome. Thanks:)
Downvoting a post can decrease pending rewards and make it less visible. Common reasons:
Submit
Really subtle changes make a menial picture look so beautiful.
Great tutorial @thecryptofiend.
I may have a go at this but unfortunately I'm not friends with any models haha
Might have a go with this with my dog or something. Close enough
Downvoting a post can decrease pending rewards and make it less visible. Common reasons:
Submit
Lol well group shoots are a good way of finding them. You can also try various online sites like Model Mayhem. Or you can practice on friends and family.
Downvoting a post can decrease pending rewards and make it less visible. Common reasons:
Submit
I always work with Photoshop and Lightroom, and i alway use Presets for my workflow. Do you use Presets for your pictures?
Downvoting a post can decrease pending rewards and make it less visible. Common reasons:
Submit
Sometimes but I prefer to just tweak things myself mostly nowadays.
Downvoting a post can decrease pending rewards and make it less visible. Common reasons:
Submit
@thecryptofiend, I have recently gotten interested in photography since taking part in the #colorchallenge by @kalemandra and have absolutely no idea what I am doing, how to take a good photo or what even constitutes a good photo so was glas to see a post from yourself on the subject and thought I might pick up a few pointers but I must say that I must not have a very good eye because to me the image you started with looked exactly the same as the one you ended with. I hope that doesn't sound rude. I'm sure to the trained eye there is a great difference but I fear I may have a long way to go before I will be able to see it. :)
Thanks for the post.
Have a great day my friend!
Downvoting a post can decrease pending rewards and make it less visible. Common reasons:
Submit
Lol well the differences are subtle - I think the more photography you do the more sensitive you will become to them!
Downvoting a post can decrease pending rewards and make it less visible. Common reasons:
Submit
Like everything else I suppose. :) Cheers mate!
Downvoting a post can decrease pending rewards and make it less visible. Common reasons:
Submit
NP:)
Downvoting a post can decrease pending rewards and make it less visible. Common reasons:
Submit
Great post! It does indeed make a huge difference when you have access to professional equipment, but like they always say, good gear is no substitute for skills and knowledge - though it sure makes things easier! :)
Downvoting a post can decrease pending rewards and make it less visible. Common reasons:
Submit
Yes it certainly helps but I think you can get great results even with basic equipment - just might take a bit more time.
Downvoting a post can decrease pending rewards and make it less visible. Common reasons:
Submit
Totally agree!
Downvoting a post can decrease pending rewards and make it less visible. Common reasons:
Submit
These are some of the same processes i use while doing post work for my 3d rendered art. Though I haven't tried the black and white layer contrast trick, that is really an interesting way of doing it. I may have to try that ;)
Great post and very informative, thank you for posting this!
Downvoting a post can decrease pending rewards and make it less visible. Common reasons:
Submit
Interesting - I suppose if you are editing a 3D image the process would be similar.
Downvoting a post can decrease pending rewards and make it less visible. Common reasons:
Submit
Really nice! I like the photograph a lot and the original photo has a lot of potential to tweek even though the original one is actually pretty amazing already! The final crop is the most amazing because it really focusses on the best part of the photo, the intense look!
Really like that you brought photoshop to Steemit! I'm familiar with Photoshop as a designer but for others it might be useful to have a short tutorial on how to edit a photo. Perhaps a next step? :D Either way I really love to read those things so thanks for sharing this!
Downvoting a post can decrease pending rewards and make it less visible. Common reasons:
Submit
I did lot's of PS editing tutorials early on - unfortunately there is no easy way to find them even for me.
Here are a few examples of the tutorials:
Gabriella - LR/Photoshop Workflow Part 1 - Basic Retouching and Editing
Gabriella - LR/Photoshop Workflow Part 2 - More advanced portrait editing
Black and White Conversion
Split Toning
Fixing Damaged Photos in PS
Silhouette Photography Tutorial
Silver Toning Experiments
Downvoting a post can decrease pending rewards and make it less visible. Common reasons:
Submit
Oh cool! Such a shame that they can't be found that easily anymore though :(. I've check them the out and your photography is stunning. You really have a talent for it as well!
I do think that if you do some more and new tutorials now, that people would really love it! Your follower count has grown and there are way more users now. People can really benefit from that knowledge!
Downvoting a post can decrease pending rewards and make it less visible. Common reasons:
Submit
I will see as I don't have as much time these days and those tutorials can take a few days to put together.
Downvoting a post can decrease pending rewards and make it less visible. Common reasons:
Submit
Great work ^^ I was previously doing photo editing myself but gave up in time.. Here is one of my sticks.
Cheers and much love
Downvoting a post can decrease pending rewards and make it less visible. Common reasons:
Submit
Beautiful:)
Downvoting a post can decrease pending rewards and make it less visible. Common reasons:
Submit
Having a great photo originally is very important! That is one of the problems I have! Taking or finding others who can take high quality photos! Luckily the cameras these days are better than ever thanks to technology!
Downvoting a post can decrease pending rewards and make it less visible. Common reasons:
Submit
Yes absolutely - you can't blame the camera!
Downvoting a post can decrease pending rewards and make it less visible. Common reasons:
Submit
first of all i would like to give a compliment to this beautiful pic really its so beautiful , secondly i want to say that you are 100% right now a days now technology is going so much advance now and we can save and make our photos more great by using these type of photoshop softwares, but one thing i want to share that only this is not the whole thing that we can make ophotos great this is so important that the person who is working on such softwares should have the full knowledge of that softwares because if we have no knowledge of that photoshop soft ware our pics can damage and can be more ugly than before, so we can get guidelines from the experts before doing this work which you did so much effeciently and one thing more there are hundreds of free apps on android which are easy and which are made for the people to guide them about photoshop a new user should use that apps before doing this professional work that will be more feasible for all of them and in last i praise your efforts you make this phote from good to great no doubt but this is the technique and proper knowledge of your which you have not every one can do it without knowing it , its great effort dear keep it up
Downvoting a post can decrease pending rewards and make it less visible. Common reasons:
Submit
Thank you!
Downvoting a post can decrease pending rewards and make it less visible. Common reasons:
Submit
great work , you can also use Camera Raw plugin in photoshop , it has many settings which are really pro and useful , and adding some sharpness and clarity will make it more clear , great work man
Downvoting a post can decrease pending rewards and make it less visible. Common reasons:
Submit
Thanks!
Downvoting a post can decrease pending rewards and make it less visible. Common reasons:
Submit
Congratulations @thecryptofiend!
Your post was mentioned in the hit parade in the following category:
Downvoting a post can decrease pending rewards and make it less visible. Common reasons:
Submit
Thanks!
Downvoting a post can decrease pending rewards and make it less visible. Common reasons:
Submit
But what if the image and the subject of the image is already perfect?
Downvoting a post can decrease pending rewards and make it less visible. Common reasons:
Submit
Lol well in that case it is unnecessary!
Downvoting a post can decrease pending rewards and make it less visible. Common reasons:
Submit
What an informative article . Ill be consulting it I assure you .
Downvoting a post can decrease pending rewards and make it less visible. Common reasons:
Submit
Thank you:)
Downvoting a post can decrease pending rewards and make it less visible. Common reasons:
Submit
Great share! if you happen to do another quick tutorial with Photoshop. I would be interested to know how to use panoramic pics and turn them into 360 degree photos while keeping the original photo intact and not morphing the image in polarize side or a tiny planet.. Just a thought!!!! will follow
Downvoting a post can decrease pending rewards and make it less visible. Common reasons:
Submit
You know it is not something I have never done myself. I should maybe try it next time I'm out and about. I think most phones software does this.
Downvoting a post can decrease pending rewards and make it less visible. Common reasons:
Submit
Thanks for responding - but actually not... I know I would have to use photoshop probably break the panoramic photo into 6 to 8 panels and slightly stretch the images and reshape the panels into triangles, but still maintain the integrity of the shot ... Problem I not so good with photoshop...
Downvoting a post can decrease pending rewards and make it less visible. Common reasons:
Submit
I think there will probably be a video tutorial on Youtube somewhere. The other thing is if you want to learn about such things I would recommend a subscription to KelbyOne : https://kelbyone.com/
Downvoting a post can decrease pending rewards and make it less visible. Common reasons:
Submit
Thank you I will look into it.
Downvoting a post can decrease pending rewards and make it less visible. Common reasons:
Submit
That's a lot of tweaking but the end product was really striking and dramatic. Initially, I thought the original photo was great in itself and as I followed through the steps you took, I was surprised at how much adjustments were made. Makes me wonder about magazine pictures (and those with fantastic Instagram snaps).
Downvoting a post can decrease pending rewards and make it less visible. Common reasons:
Submit
Magazine photos are usually heavily retouched. Instagram photos tend to just have filters applied to them, although mobile phone photos tend to come out a lot sharper and more vivid from scratch due to the jpeg filters used.
Downvoting a post can decrease pending rewards and make it less visible. Common reasons:
Submit
Nice work. I have very limited knowledge when it comes to photoshop, although I would love to learn how to use it proficiently. Thanks for explaining what each step accomplished.
Downvoting a post can decrease pending rewards and make it less visible. Common reasons:
Submit
No problem - if you look in some of the other comments I have posted some links to some of my old tutorials which go through the basics and explain some of these things in more detail.
Downvoting a post can decrease pending rewards and make it less visible. Common reasons:
Submit
Awesome. I will absolutely check those out. Thank you.
Downvoting a post can decrease pending rewards and make it less visible. Common reasons:
Submit
Great:)
Downvoting a post can decrease pending rewards and make it less visible. Common reasons:
Submit
Great tutorial! I will use those techniques next time I take a nice picture.
Downvoting a post can decrease pending rewards and make it less visible. Common reasons:
Submit
Cool:)
Downvoting a post can decrease pending rewards and make it less visible. Common reasons:
Submit
This will come in handy for my own picture taking. Thank you for sharing. :-)
Downvoting a post can decrease pending rewards and make it less visible. Common reasons:
Submit
You're welcome:)
Downvoting a post can decrease pending rewards and make it less visible. Common reasons:
Submit
Batman, we would to see your photos of the bat cave.
Downvoting a post can decrease pending rewards and make it less visible. Common reasons:
Submit
The end result is simply fantastic. It gives much more life to the photo.
Downvoting a post can decrease pending rewards and make it less visible. Common reasons:
Submit
Thank you!
Downvoting a post can decrease pending rewards and make it less visible. Common reasons:
Submit
Yea, you can do great stuff in photoshop if you know some tricks. But also there are so many very easy filters and presets what make your life way easier. I also like to work in Lightroom. Give a lot of possibility).
Downvoting a post can decrease pending rewards and make it less visible. Common reasons:
Submit
Yes filters do save time.
Downvoting a post can decrease pending rewards and make it less visible. Common reasons:
Submit
I like the colors what you got in the end. Looks cool) Good job)
Downvoting a post can decrease pending rewards and make it less visible. Common reasons:
Submit
Thank you!
Downvoting a post can decrease pending rewards and make it less visible. Common reasons:
Submit
Very nice! You are a real artist. Not all can do that. Need some artistic skills!
Downvoting a post can decrease pending rewards and make it less visible. Common reasons:
Submit
Thank you:)
Downvoting a post can decrease pending rewards and make it less visible. Common reasons:
Submit
This is nice article . I really love this article
Downvoting a post can decrease pending rewards and make it less visible. Common reasons:
Submit
@thecryptofiend - Complete wizardery!!! What a transformation you have brought about in the images. I feel that I have miles and miles to go in learning about enhancing my photographs. All I learnt so far has been some rudimentary filtering and GIF making. Looking at the work of masters like you is inspiring and frustrating (because I am way behind) at the same time. However, I will focus on the inspiration part and keep learning. It has been a journey for me so far to learn blogging, formatting and various photo related skills to follow my passion. I have enjoyed it and keep working on the challenge. Thanks for this informative and inspirational blog. Upvoted.
Update at my end is that I have posted a blog with Original GIFs of 💕𝓐 𝓓𝓪𝓽𝓮 𝔀𝓲𝓽𝓱 𝓛𝓲o𝓷𝓮𝓼𝓼𝓮𝓼 that you may find interesting. I would be honored if you visit my blogs and take a look. Your valuable comments will be eagerly awaited. Thanks
Downvoting a post can decrease pending rewards and make it less visible. Common reasons:
Submit
Thank you:)
Downvoting a post can decrease pending rewards and make it less visible. Common reasons:
Submit
Oh - I did not even expect a reply to my comment among the flood of comments but could not help commenting anyway. Thanks for acknowledging. I always look forward to your blogs. I especially liked your Artrage creations.
Downvoting a post can decrease pending rewards and make it less visible. Common reasons:
Submit
NP thanks. I just saw your lion post - that is pretty amazing. Someday I hope to see such creatures in the wild myself.
Downvoting a post can decrease pending rewards and make it less visible. Common reasons:
Submit
Let me know when you plan to travel to Africa. Perhaps we can travel together and track a few lionesses. Perhaps that will be our bucket list task? LOL
Thank you for your appreciation. Your visits to my blog are an honor.
Downvoting a post can decrease pending rewards and make it less visible. Common reasons:
Submit
That would be awesome!
Downvoting a post can decrease pending rewards and make it less visible. Common reasons:
Submit
Very nice skill! I am also a designer. Photoshop is my favourite app for photo editing.
Downvoting a post can decrease pending rewards and make it less visible. Common reasons:
Submit
Cool.
Downvoting a post can decrease pending rewards and make it less visible. Common reasons:
Submit
Awesome information thanks for sharing my friend.
Downvoting a post can decrease pending rewards and make it less visible. Common reasons:
Submit
You're welcome!
Downvoting a post can decrease pending rewards and make it less visible. Common reasons:
Submit
Photoshop is my nemesis. If I don’t use it for like one day, I forget every option I’ve learned.
Downvoting a post can decrease pending rewards and make it less visible. Common reasons:
Submit
I think that is true of most things - you have to keep it up.
Downvoting a post can decrease pending rewards and make it less visible. Common reasons:
Submit
Beautiful, she looked even more angelic by the time you were done. I am absolutely crap with photoshop, I get so frustrated with it...probably just my own massive impatience.
Downvoting a post can decrease pending rewards and make it less visible. Common reasons:
Submit
Thank you!
Downvoting a post can decrease pending rewards and make it less visible. Common reasons:
Submit
Practice makes perfect.
Downvoting a post can decrease pending rewards and make it less visible. Common reasons:
Submit
Well written and informative. Thank you for posting this. Steem On! :)
Downvoting a post can decrease pending rewards and make it less visible. Common reasons:
Submit
Thanks mate glad you found it useful:)
Downvoting a post can decrease pending rewards and make it less visible. Common reasons:
Submit
Great article!
Downvoting a post can decrease pending rewards and make it less visible. Common reasons:
Submit
Thank you!
Downvoting a post can decrease pending rewards and make it less visible. Common reasons:
Submit
I like post..i like you i like you
Downvoting a post can decrease pending rewards and make it less visible. Common reasons:
Submit
Thank you.
Downvoting a post can decrease pending rewards and make it less visible. Common reasons:
Submit
You are really good at what you do. Lovely skill you got. I'm resteemimg this
Downvoting a post can decrease pending rewards and make it less visible. Common reasons:
Submit
Thank you:)
Downvoting a post can decrease pending rewards and make it less visible. Common reasons:
Submit
Dammm that much transformation i can't believe wow
Downvoting a post can decrease pending rewards and make it less visible. Common reasons:
Submit
Thanks!
Downvoting a post can decrease pending rewards and make it less visible. Common reasons:
Submit
Amazing post.
Downvoting a post can decrease pending rewards and make it less visible. Common reasons:
Submit
No.
Downvoting a post can decrease pending rewards and make it less visible. Common reasons:
Submit
I'm so SORRY, i apology to u,i will never try that again, can u remove the flag? Sorry
Downvoting a post can decrease pending rewards and make it less visible. Common reasons:
Submit
Don't stress I removed it. It was only a 1% flag anyway. I don't normally flag but telling people not to do it has not worked so I have started flagging people at 1% to get their attention.
Downvoting a post can decrease pending rewards and make it less visible. Common reasons:
Submit
Ok,thank u very much.
Downvoting a post can decrease pending rewards and make it less visible. Common reasons:
Submit
The Photoshop application really often invents another thing into a beautiful product and to master its use can make A Da Vinci out of anyone.
Downvoting a post can decrease pending rewards and make it less visible. Common reasons:
Submit
*im on mobile phone - cant bookmark. Just commenting to bookmark - dont mind me :)
Downvoting a post can decrease pending rewards and make it less visible. Common reasons:
Submit
NP:)
Downvoting a post can decrease pending rewards and make it less visible. Common reasons:
Submit
Amazing post!
Downvoting a post can decrease pending rewards and make it less visible. Common reasons:
Submit
Thanks!
Downvoting a post can decrease pending rewards and make it less visible. Common reasons:
Submit
This is really helpful! thank you!
Downvoting a post can decrease pending rewards and make it less visible. Common reasons:
Submit
You're welcome:)
Downvoting a post can decrease pending rewards and make it less visible. Common reasons:
Submit
Downvoting a post can decrease pending rewards and make it less visible. Common reasons:
Submit
That is complete BS that people who know nothing about digital photography say.
Downvoting a post can decrease pending rewards and make it less visible. Common reasons:
Submit
Hi @thecryptofiend You Have God Skill.
Teach me Please,, Your best
Downvoting a post can decrease pending rewards and make it less visible. Common reasons:
Submit
That is very kind. You might like these old tutorials:
Gabriella - LR/Photoshop Workflow Part 1 - Basic Retouching and Editing
Gabriella - LR/Photoshop Workflow Part 2 - More advanced portrait editing
Black and White Conversion
Split Toning
Fixing Damaged Photos in PS
Silhouette Photography Tutorial
Silver Toning Experiments
Downvoting a post can decrease pending rewards and make it less visible. Common reasons:
Submit
Great job @thecryptofiend
Downvoting a post can decrease pending rewards and make it less visible. Common reasons:
Submit
Thank you!
Downvoting a post can decrease pending rewards and make it less visible. Common reasons:
Submit
nice information about photography thanks the sharing post with huge information i think is your job keep your job good luck in the steemit
Downvoting a post can decrease pending rewards and make it less visible. Common reasons:
Submit
hey man nice to see the whole process that you went throw, i know this girl, i photographed her as well Nancy Morris, are you based in London ! ? cool !
Downvoting a post can decrease pending rewards and make it less visible. Common reasons:
Submit
Very nice info dear friend :)Up&Resteem
Downvoting a post can decrease pending rewards and make it less visible. Common reasons:
Submit
Thanks!
Downvoting a post can decrease pending rewards and make it less visible. Common reasons:
Submit
Welcome!
Downvoting a post can decrease pending rewards and make it less visible. Common reasons:
Submit
:)
Downvoting a post can decrease pending rewards and make it less visible. Common reasons:
Submit
Nice thecryptofiend. Thanks for sharing.
Downvoting a post can decrease pending rewards and make it less visible. Common reasons:
Submit
Thank you!
Downvoting a post can decrease pending rewards and make it less visible. Common reasons:
Submit
Great! Though I thought it was a tutorial rather than an account of your experiment! But good end result nonetheless!
Upvoted!
Downvoting a post can decrease pending rewards and make it less visible. Common reasons:
Submit
Well it is a tutorial just not in depth.
Downvoting a post can decrease pending rewards and make it less visible. Common reasons:
Submit
just managed to catch up to this one. must say i have come back to this one and do my own experiment on other editing software
Downvoting a post can decrease pending rewards and make it less visible. Common reasons:
Submit
Cool. It is worth experimenting with.
Downvoting a post can decrease pending rewards and make it less visible. Common reasons:
Submit
Nice work mate !
Downvoting a post can decrease pending rewards and make it less visible. Common reasons:
Submit
Thank you!
Downvoting a post can decrease pending rewards and make it less visible. Common reasons:
Submit
Thanks @thecryptofiend for your recommendations and great photos. Also, look at my photos of nature. I appreciate your support!

https://steemit.com/nature/@olga.maslievich/i-enjoy-the-summer-the-spider-is-invisible-on-the-flowers-of-an-elderberry-4-original-photos
Downvoting a post can decrease pending rewards and make it less visible. Common reasons:
Submit
Thank you , great tutorial
Downvoting a post can decrease pending rewards and make it less visible. Common reasons:
Submit
You're welcome:)
Downvoting a post can decrease pending rewards and make it less visible. Common reasons:
Submit
Good work!
Downvoting a post can decrease pending rewards and make it less visible. Common reasons:
Submit
Thank you:)
Downvoting a post can decrease pending rewards and make it less visible. Common reasons:
Submit
Downvoting a post can decrease pending rewards and make it less visible. Common reasons:
Submit
Downvoting a post can decrease pending rewards and make it less visible. Common reasons:
Submit
No thank you.
Downvoting a post can decrease pending rewards and make it less visible. Common reasons:
Submit