The Problem At Hand
When I first joined Steemit a few weeks ago, I desperately wished Steemit gave me options to customize the style of my posts a bit more. Altering things like bullets, headings, and alignment are essential to make an organized and visually appealing article.
After searching for articles about how to do these things, I came to realize that there really are not many informative ones out there!
So in this post today, I'd like to teach you guys how to customize your posts using a handful of simple HTML tags.

DISCLAIMER
I've taken a few web design classes in my university education, so I am familiar with HTMl, but you DO NOT have to be a computer programmer, coder, or web designer to learn what I am going to teach in this post.
This is all very simple HTML that will be able to help you to enhance your posts as Steemit members and add value to the content you are creating.
There is already a way to add some customizations through the "Markdown Styling Guide" you will see in your preview as you write your posts. However, for me, that wasn't very intuitive, so I am going to be teaching you an alternative way to achieve those same effects.

My Method
Believe it or not, by adding HTML tags around your words/sentences/paragraphs in your post, you can stylize without even being in a text editor!
I am going to teach you the following:
- Headings
- Italics
- Bold
- Centering Text
- Subscripts/Superscripts
- Blockquotes
- Lists
Crash Course on HTML
Basically, all you need to know about HTML is how tags work.
Tags consist of customization words within the left and right carrot keys like so:
<____> </____>
(The blanks would be filled in with something like h1, blockquote, center, bold, etc.)
In order for each tag to properly effect your content, you have to put an OPEN tag and a CLOSE tag around the text you want to effect. These tags will customize your text, but the tags will not show up in your post when published.
Open tag: 
Close tag: 
Without both open and close tag, your customization will not work.
Here is an example of how you would type this sentence with the word "love" bolded:
I  posting on Steemit.
So with that knowledge, let me show you how to achieve some of the other customizations I mentioned above.
Headings
In order to make headings, all you have to do is put those opening and closing tags around the word(s) you want to be your heading. This is what you would put inside your tags for headings: h1,h2,h3,h4,h5, etc. H1 being the largest heading, and h5 being the smallest.
For example, the way I made my heading above is this:

Italics
To italicize words, all you have to do is put those opening and closing tags around the word(s) you want to italicize. Inside each tag you would have the text "em".
For example, the way I would italicize the word "Steemit" would be:

This would appear in your post like so: 
Centering Text
To center text, all you have to do is put those opening and closing tags around the word(s) you want to center. Inside each tag you would have the text "center" like this:

It would then show up in your post like this:

Subscripts & Superscripts
If for any reason you need to make subscripts or superscripts, it's quite simple.
You use these tags for subscripts: 
And these tags for superscripts: 
Here are some examples of how those subscripts and superscripts will appear:
Example subscript Example superscript
Blockquotes
Blockquotes are pretty much the coolest thing ever. They add so much style to your quotes! This is what blockquotes look like with the blockquote tags:
“Happiness can be found in the darkest of times, if one only remembers to turn on the light.” Albus Dumbledore, Harry Potter and the Prisoner of Azkaban.
In order to achieve this super cool effect, all you have to do is surround your quote with tags, like so:

Lists
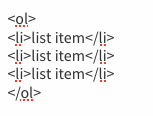
Lists are probably one of the most important things to know how to achieve. They are also a little more tricky than the rest we have talked about so far. In order to achieve an "ordered list" or a numbered list, you have to surround ALL your list items in "ol" tags. But in addition to that, you need to surround each INDIVIDUAL list item with "li" tags like so:

This is the way that will appear in your post:
- list item
- list item
- list item
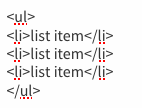
Now there will be instances when you would rather have bullet points instead of numbers. In this case, you will isntead use "unordered list" tags which use the letters "ul" instead of the "ol" used in ordered lists. Here is an example:

Here is how this will show up in your post:
- list item
- list item
- list item

Are you overwhelmed yet?
I know it seems like a lot to remember, but I hope you learned something new, and remember at least one of these tricks to use in your next Steemit post.
Follow along for more photography, tips, tricks, travel, and more.
Cheers,
@sarahjanele
www.sarahjanele.com
All images used from creative commons website, Unsplash.com
Thank you for sharing. Very useful
Downvoting a post can decrease pending rewards and make it less visible. Common reasons:
Submit
This one would have been nice too, I wish we could flag certain post to quickly reference, like a how to tab.
Downvoting a post can decrease pending rewards and make it less visible. Common reasons:
Submit
Oh yeah, I totally agree! Maybe there is a way, I'm just not sure how...
Downvoting a post can decrease pending rewards and make it less visible. Common reasons:
Submit
Nice tutorial! But you can simplify this a lot by using markdown rules instead of html. :) You can search for a quick markdown guide somewhere on the web, but for example it can be something like:
> before text to make a quotation
# before title to make it a headline (## for h2, ### for h3)
*** for new line
etc.
You'll still need center and sub tags. Also, if you want to make an inline image (only half of the width with text wrapping it), you can surround it with div that has a class of "pull-right" or "pull-left".
Try it out and hope it helps! :)
Downvoting a post can decrease pending rewards and make it less visible. Common reasons:
Submit
Great info! Thanks so much for sharing!
Downvoting a post can decrease pending rewards and make it less visible. Common reasons:
Submit
No problem! Though it's not that bad to sometimes refresh your coding skills. :) Excellent tutorial anyway!
Downvoting a post can decrease pending rewards and make it less visible. Common reasons:
Submit
thanks you
Downvoting a post can decrease pending rewards and make it less visible. Common reasons:
Submit
You are very welcome!
Downvoting a post can decrease pending rewards and make it less visible. Common reasons:
Submit
You are a good educator. This post deserves more steem! I am followimg you now and hope to learn even more. Thanks!
Downvoting a post can decrease pending rewards and make it less visible. Common reasons:
Submit
Thank you so much for your kind words! I appreciate it :) I was expecting this post to help more people, but my husband said it was a little dense... still trying to figure out how to please my Steemit audience!
Downvoting a post can decrease pending rewards and make it less visible. Common reasons:
Submit
I am new to steemit with lower reputation than you. I watched @papa-peppers videos and i think he has a very good idea about breaking up large posts to smaller versions. They would help those with lower attention spans, and promote more opportunities for authors upvotes. At least that is the stradegy I'm thinking about.
Good luck @sarahjanele
Downvoting a post can decrease pending rewards and make it less visible. Common reasons:
Submit
Oh thanks for this advice! Very helpful :)
Downvoting a post can decrease pending rewards and make it less visible. Common reasons:
Submit
Thank you for sharing this sarahjanele. I've been using an online editor, and it moves very slowly. I bookmarked this article and am going to give it a try with my next post.
Downvoting a post can decrease pending rewards and make it less visible. Common reasons:
Submit
I'm so glad this helped you! It may not be the best method of styling for everyone, but it's definitely intuitive for me :)
Downvoting a post can decrease pending rewards and make it less visible. Common reasons:
Submit
Excellent! Thanks for posting this. I've been wondering how to dress up my posts to make them more professional.
Downvoting a post can decrease pending rewards and make it less visible. Common reasons:
Submit
I'm glad you found this helpful! :)
Downvoting a post can decrease pending rewards and make it less visible. Common reasons:
Submit
:D thank you this is very helpful ♥
Downvoting a post can decrease pending rewards and make it less visible. Common reasons:
Submit
Yay, I'm glad you think so! Thanks for the comment.
Downvoting a post can decrease pending rewards and make it less visible. Common reasons:
Submit
One step closer to the professional blogger.
Thanks! @sarahjanele
Best,
Isaac
Downvoting a post can decrease pending rewards and make it less visible. Common reasons:
Submit
Thanks for the comment @isaac.rodebush!
Downvoting a post can decrease pending rewards and make it less visible. Common reasons:
Submit
Markdown over HTML for here for sure, but this is helpful! I'm not sure if you can use center tag with markdown? I've tried to use it and maybe I'm doing it incorrectly but its given me some trouble
Downvoting a post can decrease pending rewards and make it less visible. Common reasons:
Submit
Oh interesting! Yeah, I'm pretty comfortable with HTML so I haven't really played with the markdown at all. I'll definitely look more into it though! I'm unsure about why the center tag would not be working...hmm.
Downvoting a post can decrease pending rewards and make it less visible. Common reasons:
Submit
NVM! Totally just tried again in my latest post and it works! Haha I guess I was doing it wrong. Thanks for the tips!
Downvoting a post can decrease pending rewards and make it less visible. Common reasons:
Submit
Yay, I'm so glad it worked for you! :)
Downvoting a post can decrease pending rewards and make it less visible. Common reasons:
Submit
useful post, thank you.
Downvoting a post can decrease pending rewards and make it less visible. Common reasons:
Submit
I'm glad you found it useful. I appreciate your comment!
Downvoting a post can decrease pending rewards and make it less visible. Common reasons:
Submit
Awesome post! I literally know almost nothing about HTML. So this is a big help! Thank you for the extremely informative post. I'm following, can't wait to learn more :)
Downvoting a post can decrease pending rewards and make it less visible. Common reasons:
Submit
I'm glad you found this helpful! :) Thanks for the comment.
Downvoting a post can decrease pending rewards and make it less visible. Common reasons:
Submit
Sure thing! Thanks for the info!
Downvoting a post can decrease pending rewards and make it less visible. Common reasons:
Submit