Components- Malzemeler
-Arduino Uno
-Breadboard
-HC-SR04 Ultrasonic Distance Sensor
-330R Resistor
-Buzzer
-Jumper Wires
Requements-Gereksinimler
-Arduino IDE(I used version 1.8)
- Intermediate code and algorithm knowledge
Correct Github Link=>Here
//Link has been edited.
Tutorial Contents -Yazının İçeriği
Hello to everyone,this article is about the arduino parking sensor project.It is a very simple and useful project.This project can be improved by adding different components.Have fun!
Merhaba arkadaşlar bu yazımızda Arduino Uno kullanarak Park sensörü projesini yapacağız.
"Park sensörü projesinde" hareketli bileşen HC-SR04 olmalı o yüzden bu projeye Radar projesi de diyebiliriz.Kullandığımız uzaklık sensörü 2-400 cm arası işlem yapabilme kabiliyetine sahiptir. Çalışma prensibi çok basittir: Sensörün Trig girişinden 40 kHz frekansında ultrasonik bir ses yayılmasını sağlar. Bu ses dalgası belirlediğimiz aralıkta herhangi bir cisme çarpıp dönerse.Ses çıkış pini(Echo) aktif hale gelir. Elektrik sinyalinin giriş-çıkış aralığını saniye cinsinden ölçüyoruz ve göderilen frekansin sn de kat ettiği yolla çarparak uzaklık tespiti yapıyoruz.Bu sensörde uzaklık tespiti doğrusal bir biçimde yapılmaktadır.
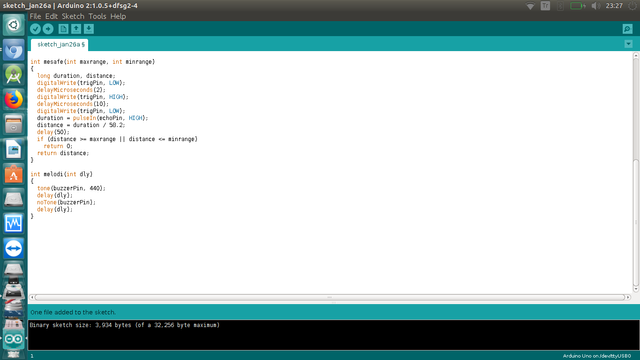
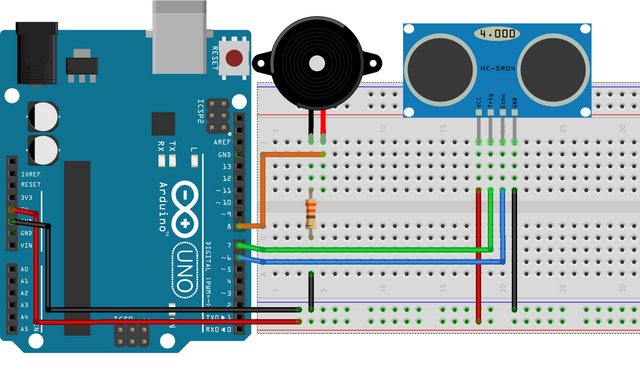
Projenin temel bileşenini tanıttığımıza göre bunun yanında buzzer(elinizde varsa basit bir hoparlör de olabilir) kullanıyoruz.Bu uygulamada buzzer yerine direk olarak veya paralel bir şekilde led de bağlayabilirsiniz.Ekstradan bir uyarı bileşeni eklemiş olursunuz.Son olarak 330R lik bir direnç eğer led kullanacaksanız kullandığınız her led için de bir direnci led e seri olarak bağlamalısınız.Bu projede uzaklığı 50 cm üzerinden alarak projemizi gerçekleştirdik.Cisim sensöre yaklaştıkça buzzer a giden sesin şiddeti doğru orantılı olarak çıktı vermektedir.
Proposal-Öneri
Uyarı!:Arduino'nun giriş değerleri 5V-12V arası olmalıdır.Bunun haricindeki girdiler.Arduino'nun yanmasına veya mantıksız sonuçlar üretmesine neden olabilir.
Warning!:Input values must be 5V-12V.
Mockups / Examples

Circuit-Devre

Result
Posted on Utopian.io - Rewarding Open Source Contributors
Thank you for the contribution. It has been approved.
You can contact us on Discord.
[utopian-moderator]
Downvoting a post can decrease pending rewards and make it less visible. Common reasons:
Submit
Hey @ozgurbulut I am @utopian-io. I have just upvoted you!
Achievements
Suggestions
Get Noticed!
Community-Driven Witness!
I am the first and only Steem Community-Driven Witness. Participate on Discord. Lets GROW TOGETHER!
Up-vote this comment to grow my power and help Open Source contributions like this one. Want to chat? Join me on Discord https://discord.gg/Pc8HG9x
Downvoting a post can decrease pending rewards and make it less visible. Common reasons:
Submit
Authors can not create their own GitHub repository. They can only use an official repo of the project. So change it to
arduino/Arduinoplease. @fuzehDownvoting a post can decrease pending rewards and make it less visible. Common reasons:
Submit